OpenShift Monitoring
Skip Prerequisites, Web and LPAR2RRD tabs in case of configuring Virtual Appliance, Docker or a Container
Insert content below:
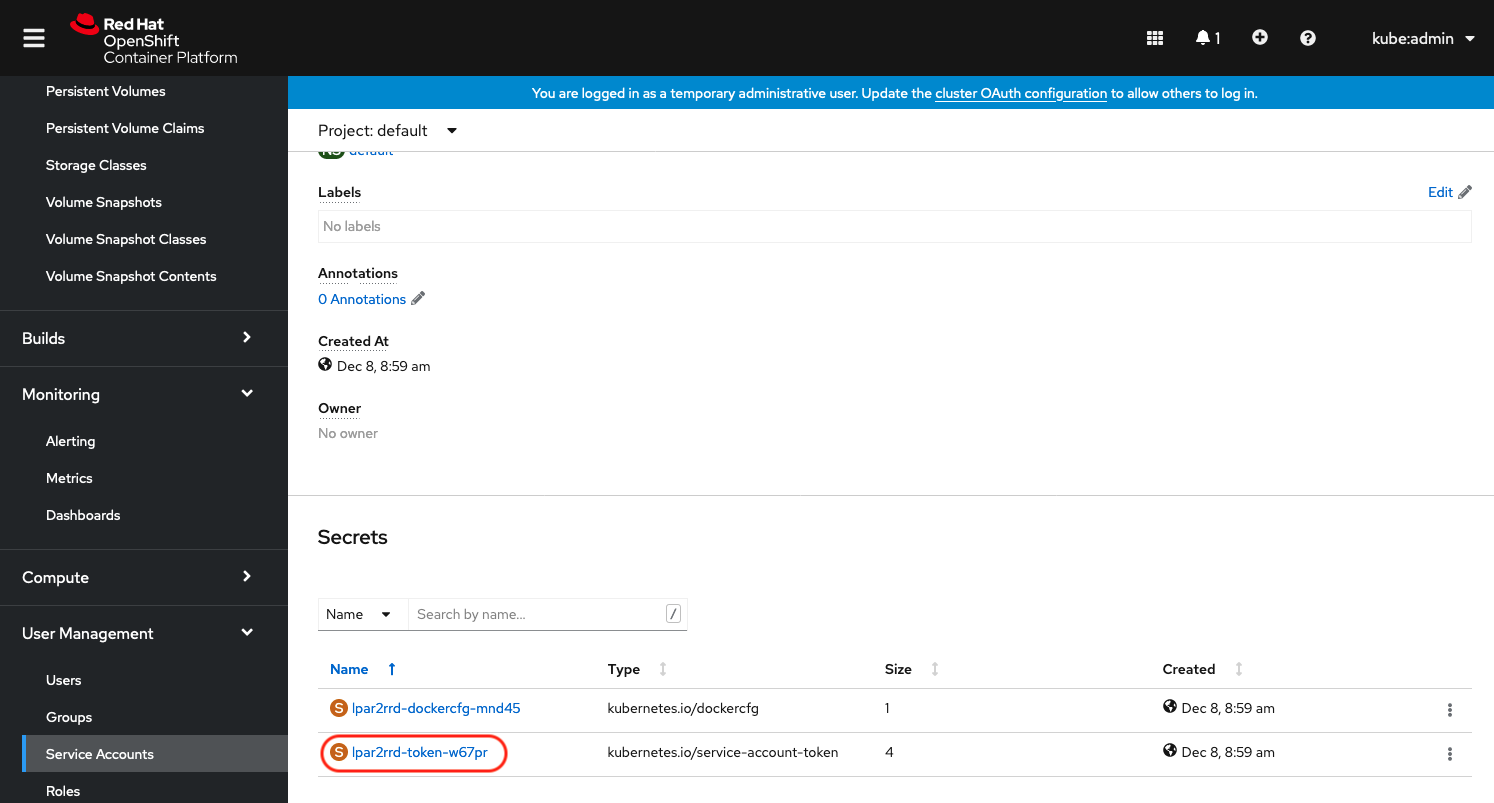
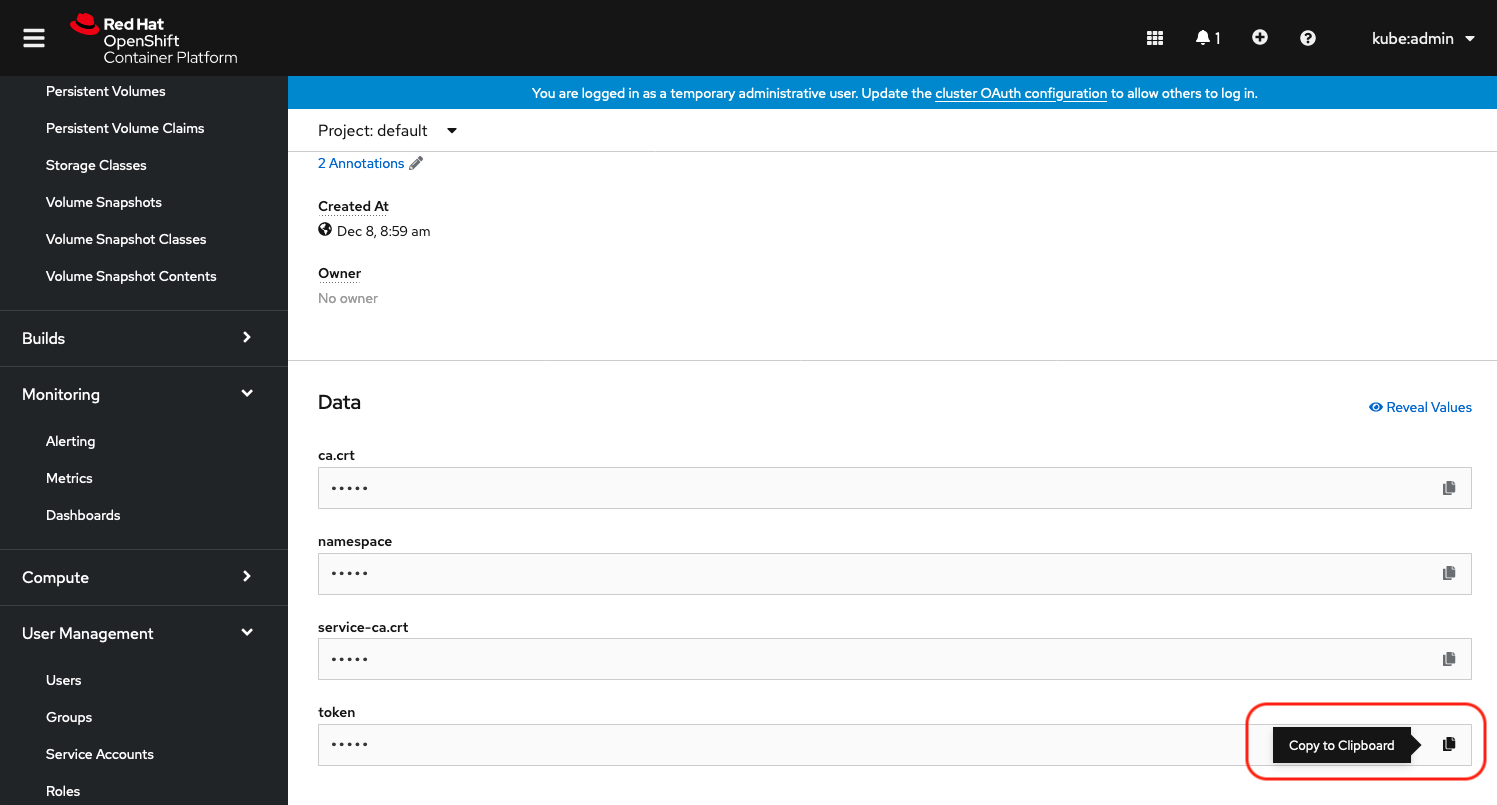
Click on "lpar2rrd-token-xxxxx" under to "Secrets"
Copy lpar2rrd token
Insert content below:
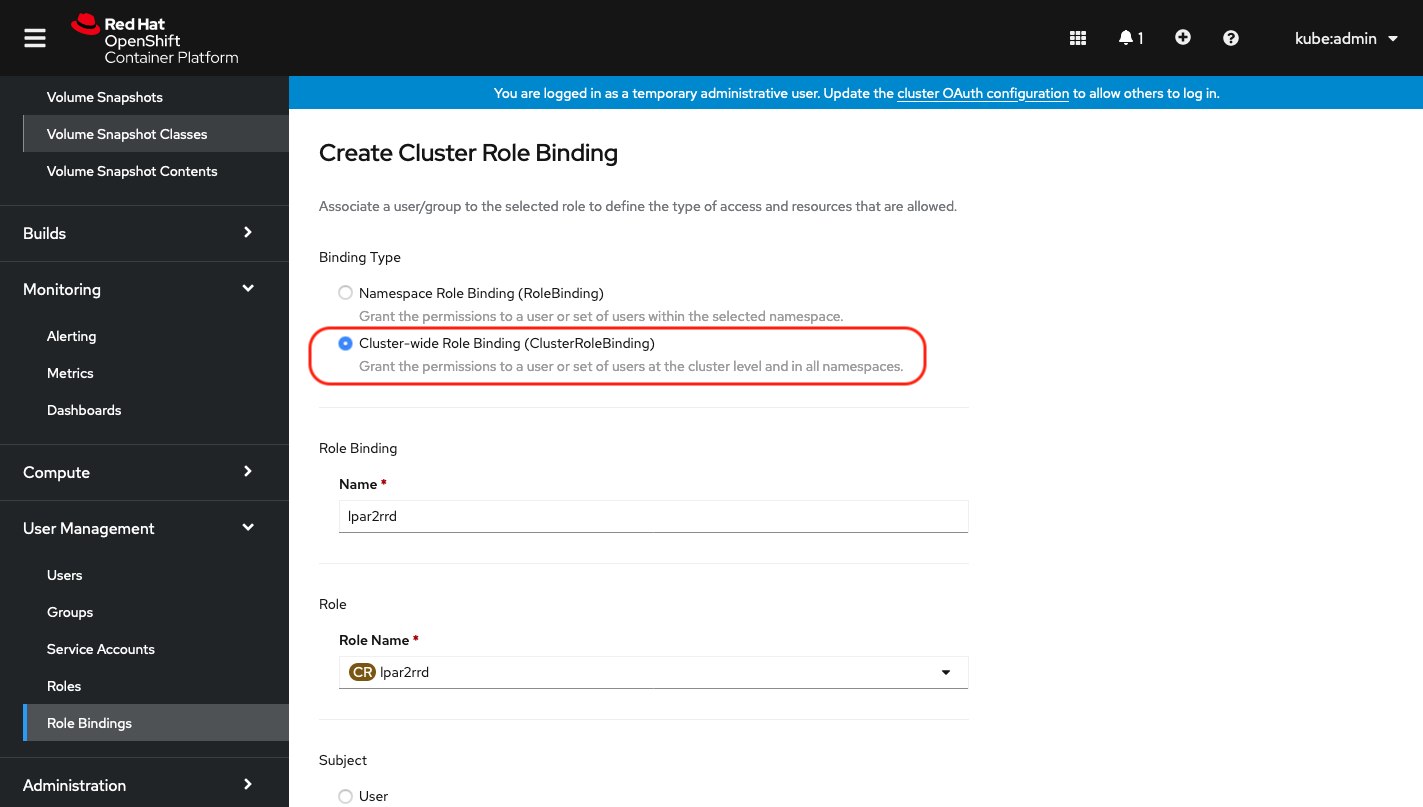
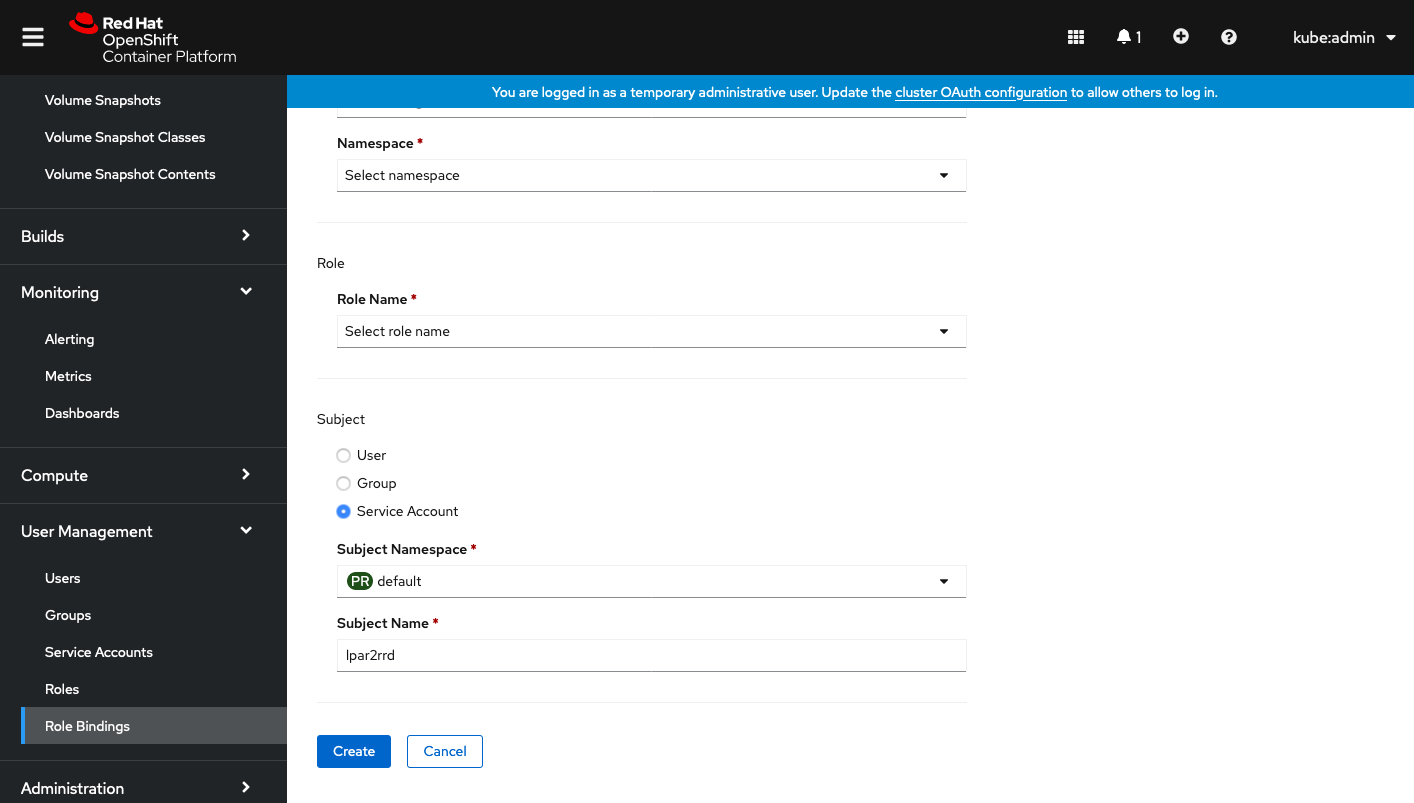
Select Binding type "Cluster-wide Role Binding", type the role binding name to "lpar2rrd" and select Role Name "lpar2rrd"
Select Subject "Service Account" and type "lpar2rrd" as Subject Name
HW sizing
Consider usage of our brand new full-stack infrastructure monitoring tool XorMon as LPAR2RRD replacement.
It brings a new level of infrastructure monitoring by relying on a modern technology stack.
In particular, reporting, exporting, alerting and presentation capabilities are unique on the market.
Follow installation procedure for your operating system platform
Install LPAR2RRD server (all under lpar2rrd user)
-
Download the latest LPAR2RRD server
Upgrade your already running LPAR2RRD instance.
- Install it:
# su - lpar2rrd
$ tar xvf lpar2rrd-7.XX.tar
$ cd lpar2rrd-7.XX
$ ./install.sh
$ cd /home/lpar2rrd/lpar2rrd
- Make sure all Perl modules are in place
cd /home/lpar2rrd/lpar2rrd
. etc/lpar2rrd.cfg; $PERL bin/perl_modules_check.pl
If there is missing "LWP::Protocol::https" then check this docu to fix it
- Enable Apache authorisation
su - lpar2rrd
umask 022
cd /home/lpar2rrd/lpar2rrd
cp html/.htaccess www
cp html/.htaccess lpar2rrd-cgi
- Schedule to run it from lpar2rrd crontab (it might already exist there)
Add if it does not exist as above$ crontab -l | grep load.sh $
$ crontab -e

# LPAR2RRD UI
0,30 * * * * /home/lpar2rrd/lpar2rrd/load.sh > /home/lpar2rrd/lpar2rrd/load.out 2>&1
Assure there is just one such entry in crontab.
- You might need to add lpar2rrd user into /etc/cron.allow (Linux) or /var/adm/cron/cron.allow (AIX) if 'crontab -e' command fails
Allow it for lpar2rrd user as root user.# echo "lpar2rrd" >> /etc/cron.allow
- Assure you have a cron job for Kubernetes is in place (upgrade script might do it automatically)
Skip it on the Virtual Appliance, it is already there.
Add it if it does not exist like above
$ crontab -l | grep "load_openshift.sh"
$
$ crontab -e

# RedHat OpenShift support
0,20,40 * * * *  /home/lpar2rrd/lpar2rrd/load_openshift.sh > /home/lpar2rrd/lpar2rrd/load_openshift.out 2>&1
-
Initial start from cmd line:
$ cd /home/lpar2rrd/lpar2rrd
$ ./load.sh
- Go to the web UI: http://<your web server>/lpar2rrd/
Use Ctrl-F5 to refresh the web browser cache.
Troubleshooting
-
If you have any problems with the UI then check:
(note that the path to Apache logs might be different, search apache logs in /var)tail /var/log/httpd/error_log # Apache error log tail /var/log/httpd/access_log # Apache access log tail /var/tmp/lpar2rrd-realt-error.log # STOR2RRD CGI-BIN log tail /var/tmp/systemd-private*/tmp/lpar2rrd-realt-error.log # STOR2RRD CGI-BIN log when Linux has enabled private temp
- Test of CGI-BIN setup
umask 022
cd /home/lpar2rrd/lpar2rrd/
cp bin/test-healthcheck-cgi.sh lpar2rrd-cgi/
go to the web browser: http://<your web server>/lpar2rrd/test.html
You should see your Apache, LPAR2RRD, and Operating System variables, if not, then check Apache logs for connected errors
OpenShift console install
The instructions below are for installation via OpenShift console, as an option you can use Kubectl command line installation.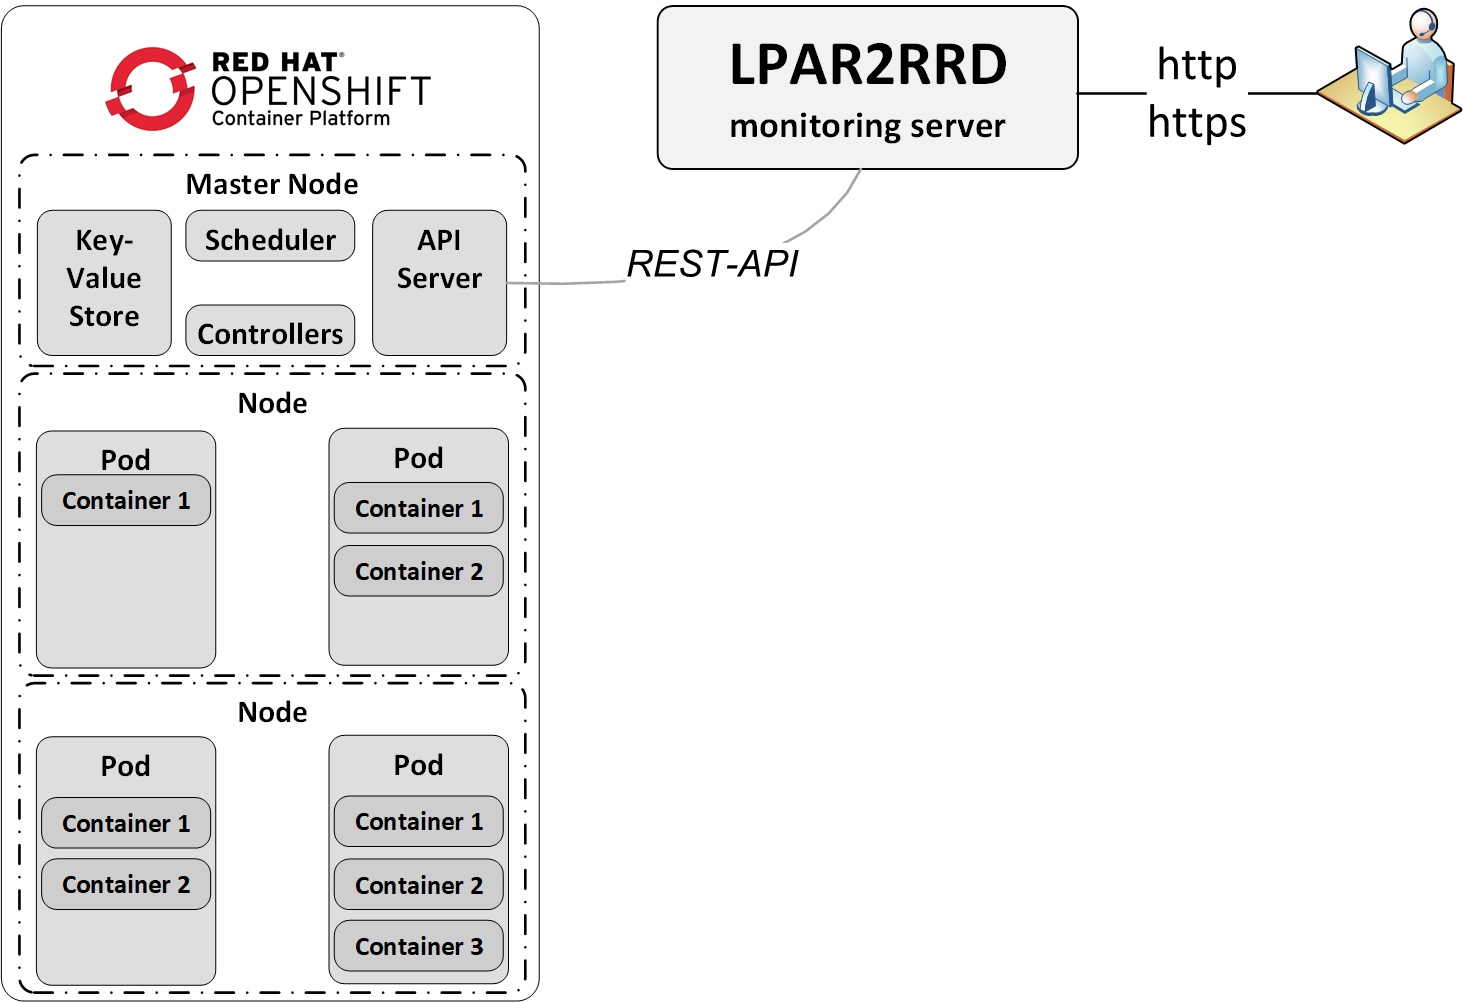 |
Create a lpar2rrd service account
You can choice whatever else account name than lpar2rrd.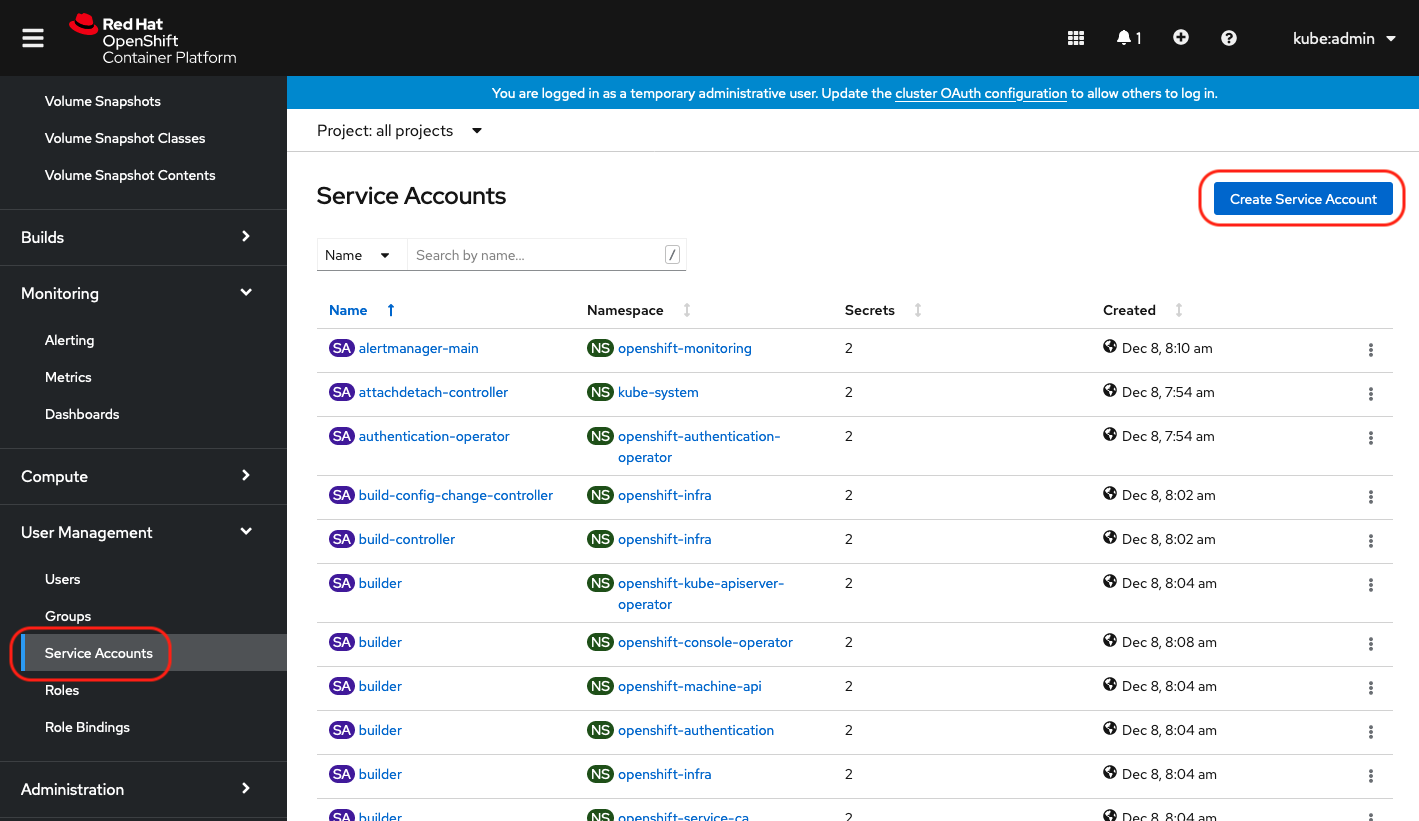 |
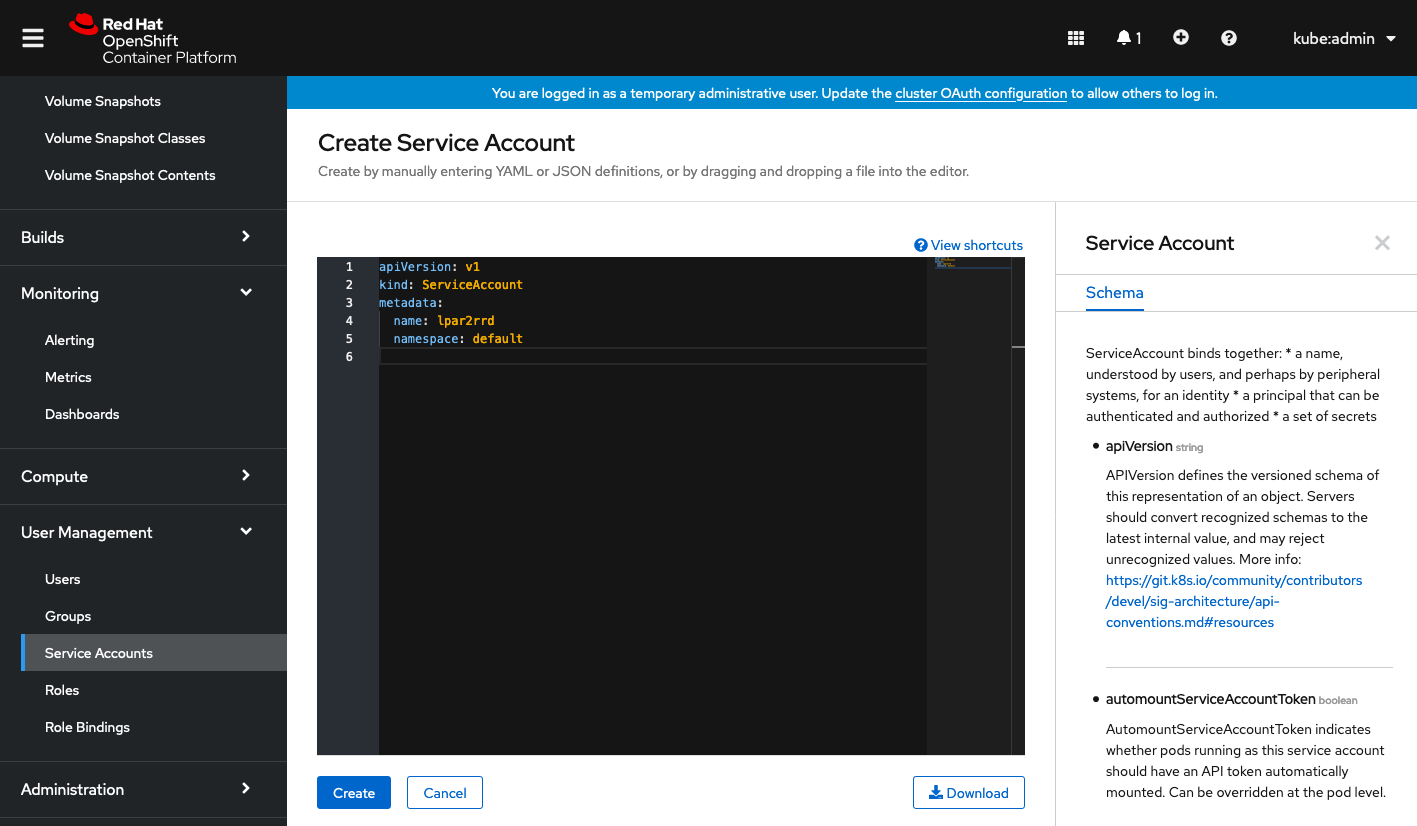
Insert content below:
    apiVersion: v1
    kind: ServiceAccount
    metadata:
      name: lpar2rrd
      namespace: default
 |
Click on "lpar2rrd-token-xxxxx" under to "Secrets"
 |
Copy lpar2rrd token
 |
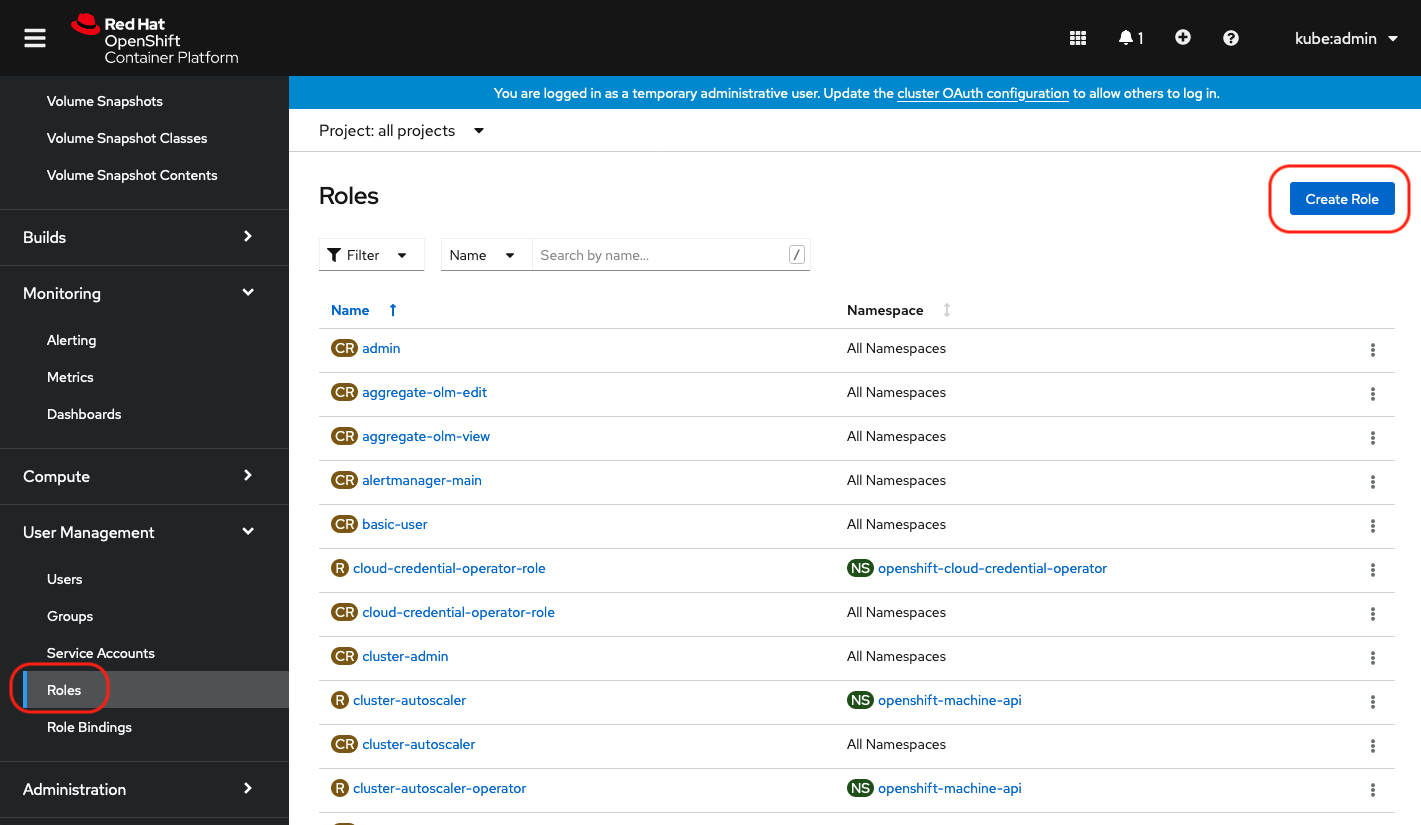
Create a lpar2rrd role
 |
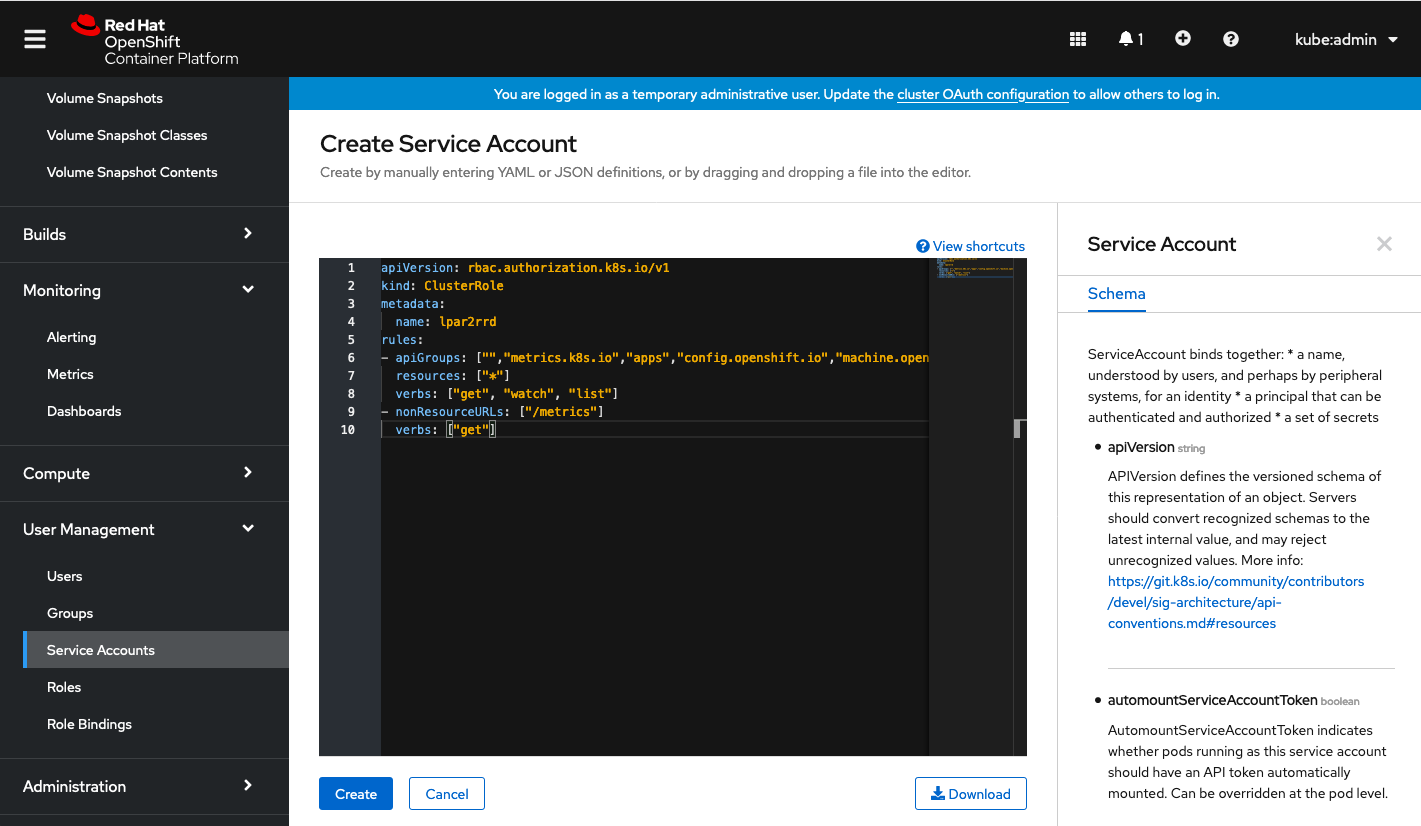
Insert content below:
    apiVersion: rbac.authorization.k8s.io/v1
    kind: ClusterRole
    metadata:
      name: lpar2rrd
    rules:
    - apiGroups: ["","metrics.k8s.io","apps","config.openshift.io","machine.openshift.io","machineconfiguration.openshift.io","monitoring.coreos.com","project.openshift.io","route.openshift.io","storage.k8s.io"]
      resources: ["*"]
      verbs: ["get", "watch", "list"]
    - nonResourceURLs: ["/metrics"]
      verbs: ["get"]
 |
Create a lpar2rrd role binding
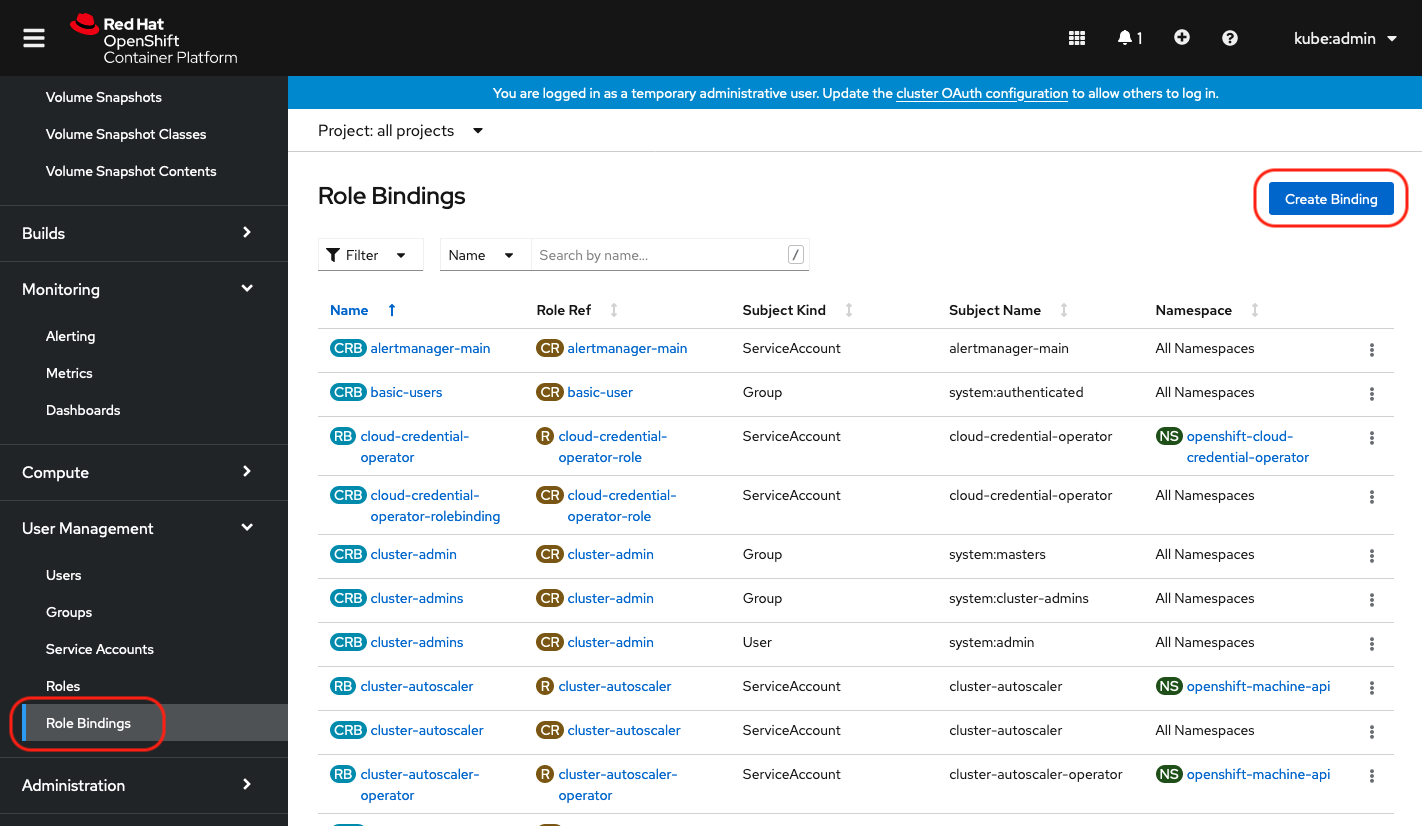 |
Select Binding type "Cluster-wide Role Binding", type the role binding name to "lpar2rrd" and select Role Name "lpar2rrd"
 |
 |
Configure RedHat OpenShift in LPAR2RRD
-
Open network connection to the RedHat OpenShift from LPAR2RRd server.
If it is in Google Cloud then port 443, if it is in Kubernetes then port 6443.
-
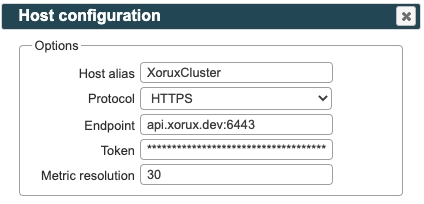
LPAR2RRD UI ➡ Settings icon ➡ RedHat OpenShift ➡ New
- Make sure cron job for OpenShift is in place (upgrade script might do it for you automatically)
Skip this step if you install the Virtual Appliance - it is already taken care of.Add following lines to crontab if necessary$ crontab -l | grep "load_openshift.sh" $
  $ crontab -e

  # Openshift support
  0,20,40 * * * *  /home/lpar2rrd/lpar2rrd/load_openshift.sh > /home/lpar2rrd/lpar2rrd/load_openshift.out 2>&1
- Wait 30 minutes and then go to the web UI: http://<your web server>/lpar2rrd/
Use Ctrl-F5 to refresh the web browser cache.
Kubectl install
The instructions below are for installation via the kubectl command line as an option to OpenShift console installation |
Create a lpar2rrd service account
You can choice whatever else account name than lpar2rrd.$ kubectl create serviceaccount lpar2rrd
Create a clusterrole
-
Create file ClusterRole with this content:
  apiVersion: rbac.authorization.k8s.io/v1
  kind: ClusterRole
  metadata:
    name: lpar2rrd
  rules:
  - apiGroups: ["","metrics.k8s.io","apps","config.openshift.io","machine.openshift.io","machineconfiguration.openshift.io","monitoring.coreos.com","project.openshift.io","route.openshift.io","storage.k8s.io"]
    resources: ["*"]
    verbs: ["get", "watch", "list"]
  - nonResourceURLs: ["/metrics"]
    verbs: ["get"]
Apply it by:
$ kubectl apply -f ClusterRole.yml
Create a clusterrolebinding
-
Create file ClusterRoleBinding.yml with this content:
  apiVersion: rbac.authorization.k8s.io/v1
  kind: ClusterRoleBinding
  metadata:
    name: lpar2rrd
  subjects:
  - kind: ServiceAccount
    name: lpar2rrd
    namespace: default
  roleRef:
    apiGroup: rbac.authorization.k8s.io
    kind: ClusterRole
    name: lpar2rrd
Apply it by:
$ kubectl apply -f ClusterRoleBinding.yml
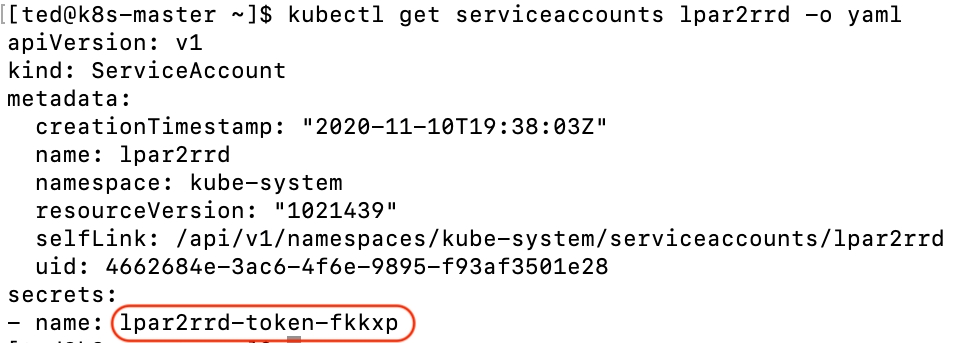
Get lpar2rrd token
$ kubectl get serviceaccounts lpar2rrd -o yaml
 |
$ kubectl describe secret lpar2rrd-token-fkkxp
 |
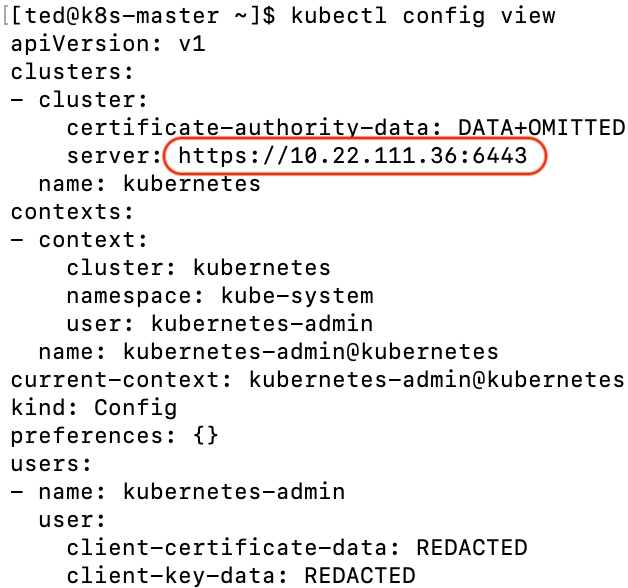
Get cluster endpoint
$ kubectl config view
 |
Configure RedHat OpenShift in LPAR2RRD
-
LPAR2RRD UI ➡ Settings icon ➡ RedHat OpenShift ➡ New
- Make sure cron job for OpenShift is in place (upgrade script might do it for you automatically)
Skip this step if you install the Virtual Appliance - it is already taken care of.Add following lines to crontab if necessary$ crontab -l | grep "load_openshift.sh" $
  $ crontab -e

  # Openshift support
  0,20,40 * * * *  /home/lpar2rrd/lpar2rrd/load_openshift.sh > /home/lpar2rrd/lpar2rrd/load_openshift.out 2>&1
- Wait 30 minutes and then go to the web UI: http://<your web server>/lpar2rrd/
Use Ctrl-F5 to refresh the web browser cache.