MS Windows, Hyper-V Monitoring
HW sizing
Consider usage of our brand new full-stack infrastructure monitoring tool XorMon as LPAR2RRD replacement.
It brings a new level of infrastructure monitoring by relying on a modern technology stack.
In particular, reporting, exporting, alerting and presentation capabilities are unique on the market.
Follow installation procedure for your operating system platform
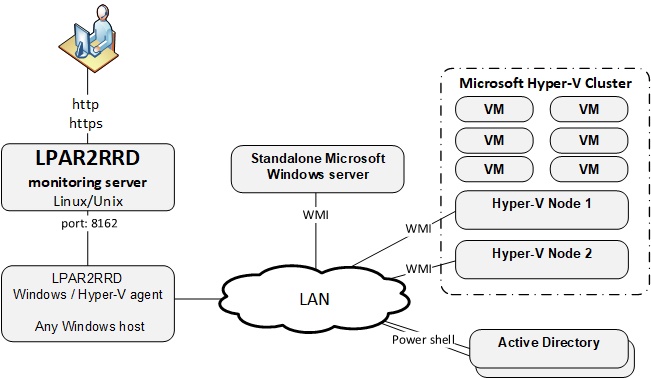
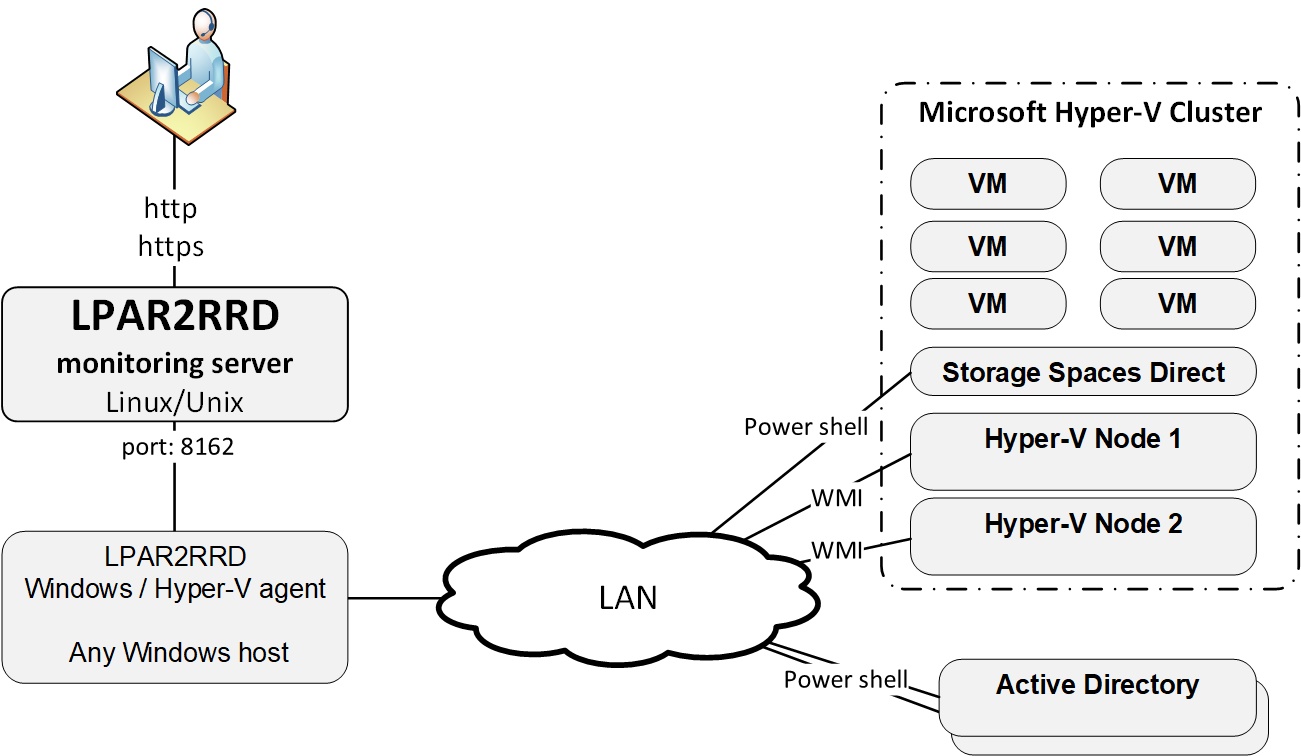
LPAR2RRD is able to monitor stand-alone MS Windows servers and MS Hyper-V performance metrics.
Implementation is done through single Windows OS agent running on any Windows host in the Windows domain.
This OS agent gets all required configuration from the AD and performance data of monitored hosts through WMI.
It passes such data to LPAR2RRD server where data is saved and presented.
LPAR2RRD Windows OS agent works everywhere where is available PowerShell 3 and higher
It does not directly depends on Windows version, if you are able to upgrade PowerShell to 3.0+ on older machines then it will work.
Installation summary
- Allow TCP connection initiated from Windows LPAR2RRD Hyper-V agent server to LPAR2RRD server on port 8162
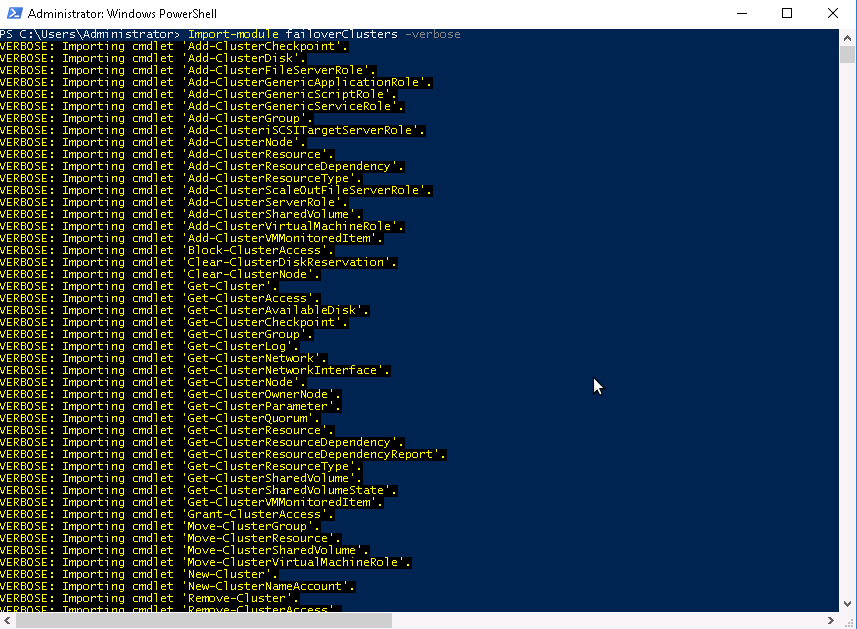
- PowerShell version 3 and higher only is supported on Windows hosts
User creation
- Create LPAR2RRD user in the AD with membership in these groups:
- Event Log Readers
- Hyper-V Administrators
- Performance Log Users
- Performance Monitor Users
- Set rights in GPO and AD using this manual
- Give local admin rights to the LPAR2RRD user on the Win server where LPAR2RRD Hyper-V agent will be running.
Add him into Domain Users group.
- Assign read-only rights for monitored Hyper-V clusters to LPAR2RRD user

OS agent installation
- Unzip LPAR2RRD-Win-agent-8.0.0.zip
- Unblock these files by right clicking them and checking "Unblock"
- Setup.vbs
- Configuration.vbs
- LPAR2RRD-agent.ps1
- LPAR2RRD-agent-Configuration.ps1
- LPAR2RRD-agent-Installer.ps1
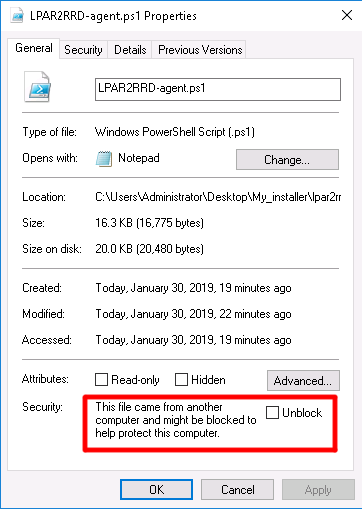
When 'Unblock" does not help and installation does not start (PowerShell install window immediatelly disapears)
you might need to Set-ExecutionPolicy to enable running powershell for current user.
That is a common case on Windows desktops.
- Run: Setup.vbs
- Select installation directory
Note that 'C:\Program Files\<whatever...>\' does not work on all Windows (especially Desktops) due to some permission issue, files are not copied there, an use alternative path

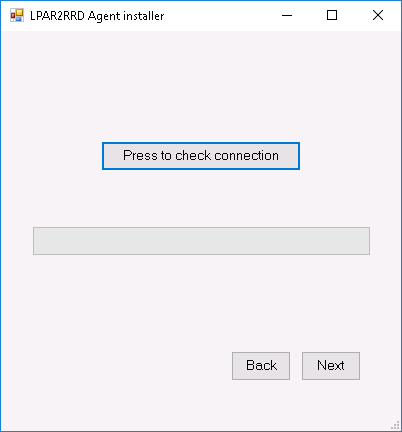
- Put hostname of the XorMon server
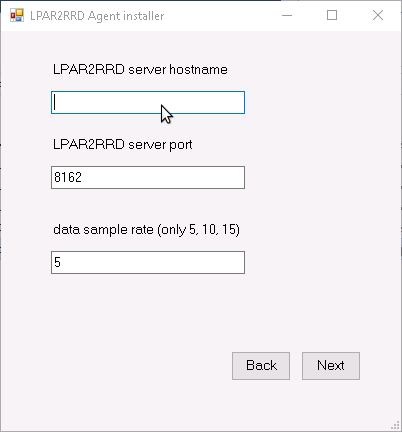
- Test connection to the XorMon server
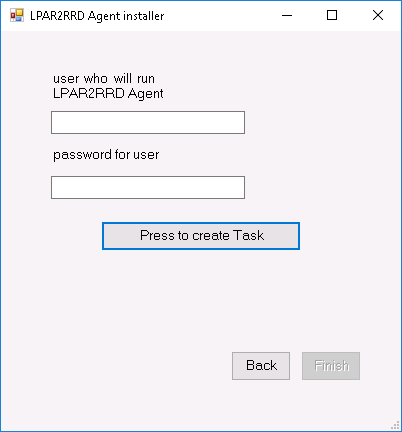
- Put user which will run LPAR2RRD OS agent on this machine
- Select monitored mode
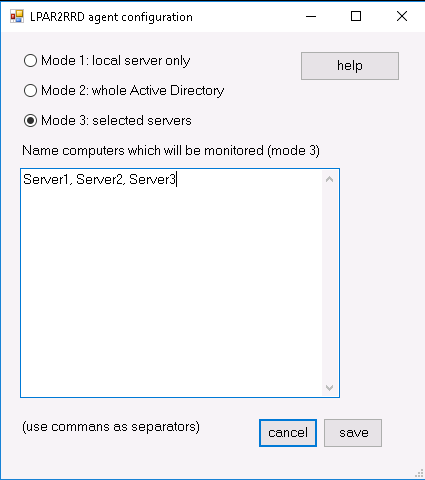 In case of a cluster: add there cluster name and names of all nodes as well like: cluster1,node1,node2,cluster2,node...
 - leave it in default mode and monitor just the server where it is installed
- monitor all visible servers from AD
- monitor only specific servers (recommended), added into cfg file
for monitoring of cluster - add its name to servers/nodes too like: cluster1,node1,node2,cluster2,node... - Wait about 30 minutes, then Ctrl-F5 in your LPAR2RRD UI and you should see Hyper-V folder in the main menu
Monitored modes
-
The agent can run in these modes:
Troubleshooting
Install LPAR2RRD server (all under lpar2rrd user)
-
Definitelly use the latest available version (6.10+ at least)
- Install it:
# su - lpar2rrd
$ tar xvf lpar2rrd-7.XX.tar
$ cd lpar2rrd-7.XX
$ ./install.sh
$ cd /home/lpar2rrd/lpar2rrd
- Make sure all Perl modules are in place
cd /home/lpar2rrd/lpar2rrd
. etc/lpar2rrd.cfg; $PERL bin/perl_modules_check.pl
If there is missing "LWP::Protocol::https" then check this docu to fix it
- Enable Apache authorisation
umask 022
cd /home/lpar2rrd/lpar2rrd
cp html/.htaccess www
cp html/.htaccess lpar2rrd-cgi
- Schedule to run it from lpar2rrd crontab (it might already exist there)
Add if it does not exist as above$ crontab -l | grep load.sh $
$ crontab -e

# LPAR2RRD UI
0,30 * * * * /home/lpar2rrd/lpar2rrd/load.sh > /home/lpar2rrd/lpar2rrd/load.out 2>&1
Assure there is just one such entry in crontab.
- You might need to add lpar2rrd user into /etc/cron.allow (Linux) or /var/adm/cron/cron.allow (AIX) if 'crontab -e' command fails
Allow it for lpar2rrd user as root user.# echo "lpar2rrd" >> /etc/cron.allow
- Assure you have a cron jobs for Hyper-V in place (upgrade script might do it automatically)
Skip it on the Virtual Appliance, it is already there.Add it if it does not exist like above$ crontab -l | grep "load_hyperv.sh" $
$ crontab -e

# MS Hyper-V support
0,20,40 * * * *  /home/lpar2rrd/lpar2rrd/load_hyperv.sh > /home/lpar2rrd/lpar2rrd/load_hyperv.out 2>&1
-
Initial start from cmd line:
$ cd /home/lpar2rrd/lpar2rrd
$ ./load.sh
- Go to the web UI: http://<your web server>/lpar2rrd/
Use Ctrl-F5 to refresh the web browser cache.
Troubleshooting
-
If you have any problems with the UI then check:
(note that the path to Apache logs might be different, search apache logs in /var)tail /var/log/httpd/error_log # Apache error log tail /var/log/httpd/access_log # Apache access log tail /var/tmp/lpar2rrd-realt-error.log # STOR2RRD CGI-BIN log tail /var/tmp/systemd-private*/tmp/lpar2rrd-realt-error.log # STOR2RRD CGI-BIN log when Linux has enabled private temp
- Test of CGI-BIN setup
umask 022
cd /home/lpar2rrd/lpar2rrd/
cp bin/test-healthcheck-cgi.sh lpar2rrd-cgi/
go to the web browser: http://<your web server>/lpar2rrd/test.html
You should see your Apache, LPAR2RRD, and Operating System variables, if not, then check Apache logs for connected errors
S2D prerequisites
- WinServer 2019
- Performance history enabled (enabled by default) docs.microsoft.com/en-us/windows-server/storage/storage-spaces/performance-history