XenServer Monitoring
Follow installation procedure for your operating system platform
XenServer and Citrix Hypervisor are supported
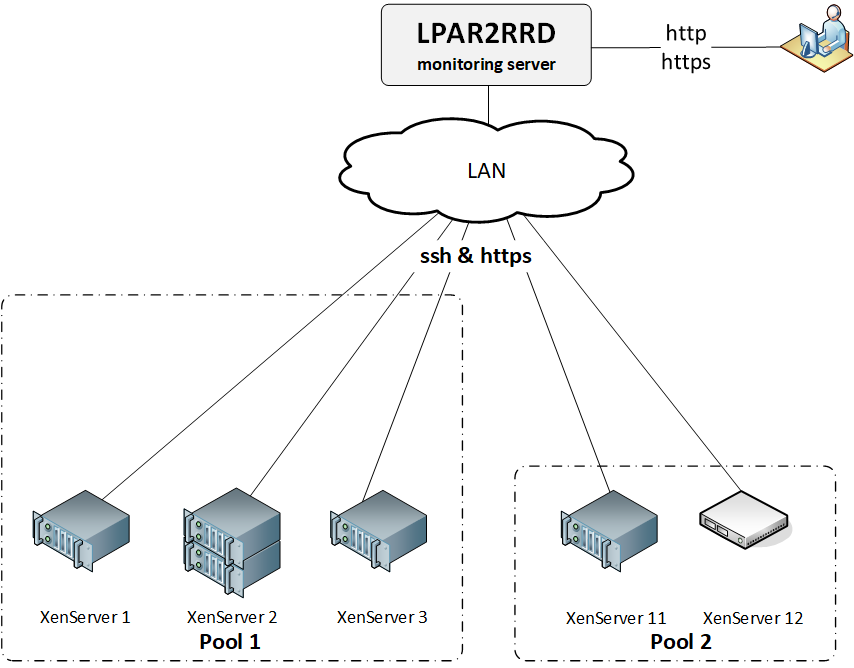
Implementation is agent less, data sources:
 |
Implementation is agent less, data sources:
- performance data: XCP RRDD over XAPI (HTTP/HTTPS)
- configuration data: OS commands via SSH
XenServer host connectivity
-
Allow access from the LPAR2RRD host to all XenServer hosts ports 443 (HTTPS) and 22 (SSH)
You might verify it manually like this for each host:
$ perl /home/lpar2rrd/lpar2rrd/bin/conntest.pl 192.168.1.1 443
  Connection to "192.168.1.1" on port "443" is ok
$ perl /home/lpar2rrd/lpar2rrd/bin/conntest.pl 192.168.1.1 22
  Connection to "192.168.1.1" on port "22" is ok
Users access
Create user account (preferably lpar2rrd) on each XenServer host.- The user account on your XenServer host must be allowed to read data from commands such as
xe …-data-source-query
The account should be assigned at least the Pool Admin role in XenServer's Role Based Access Control (RBAC).- If your setup has RBAC configured, create user account
lpar2rrdand assign it the Pool Admin role. - If you are using XenServer Free edition or do not have RBAC configured, only
rootuser has necessary privileges.
- If your setup has RBAC configured, create user account
- Exchange ssh-keys to all XenServer hosts.
Run this on LPAR2RRD server for each host:# su - lpar2rrd $ ssh-copy-id xen-host1 lpar2rrd@xen-host1's password: Number of key(s) added: 1 Now try logging into the machine, with: "ssh 'xen-host1'" $ ssh xen-host1 xen-host1 $
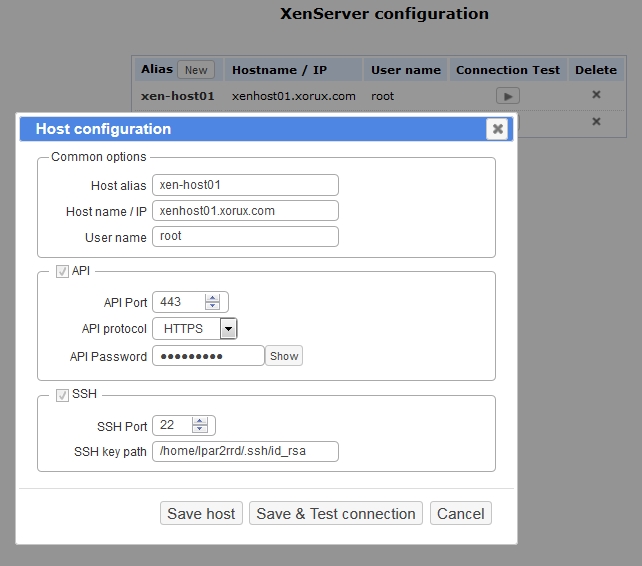
Attach XenServer hosts
-
All is configured from the UI.


- Assure you have a cron jobs for XenServer in place (upgrade script might do it automatically)
Skip it on the Virtual Appliance, it is already there.Add it if it does not exist like above$ crontab -l | grep "load_xenserver.sh" $
$ crontab -e # XenServer support 0,20,40 * * * * /home/lpar2rrd/lpar2rrd/load_xenserver.sh > /home/lpar2rrd/lpar2rrd/load_xenserver.out 2>&1
- Wait 30 minutes and then go to the web UI: http://<your web server>/lpar2rrd/
Use Ctrl-F5 to refresh the web browser cache.
Install LPAR2RRD server (all under lpar2rrd user)
-
Download the latest LPAR2RRD server
Upgrade your already running LPAR2RRD instance.
- Install it:
# su - lpar2rrd $ tar xvf lpar2rrd-7.XX.tar $ cd lpar2rrd-7.XX $ ./install.sh $ cd /home/lpar2rrd/lpar2rrd
- Make sure all Perl modules are in place
cd /home/lpar2rrd/lpar2rrd . etc/lpar2rrd.cfg; $PERL bin/perl_modules_check.pl
If there is missing "LWP::Protocol::https" then check this docu to fix it
- Enable Apache authorisation
su - lpar2rrd umask 022 cd /home/lpar2rrd/lpar2rrd cp html/.htaccess www cp html/.htaccess lpar2rrd-cgi
- Schedule to run it from lpar2rrd crontab (it might already exist there)
Add if it does not exist as above$ crontab -l | grep load.sh $
$ crontab -e # LPAR2RRD UI 0,30 * * * * /home/lpar2rrd/lpar2rrd/load.sh > /home/lpar2rrd/lpar2rrd/load.out 2>&1
Assure there is just one such entry in crontab.
- You might need to add lpar2rrd user into /etc/cron.allow (Linux) or /var/adm/cron/cron.allow (AIX) if 'crontab -e' command fails
Allow it for lpar2rrd user as root user.# echo "lpar2rrd" >> /etc/cron.allow
- Assure you have a cron jobs for XenServer in place (upgrade script might do it automatically)
Skip it on the Virtual Appliance, it is already there.
Add it if it does not exist like above
$ crontab -l | grep "load_xenserver.sh"
$
$ crontab -e

# XenServer support
0,20,40 * * * *  /home/lpar2rrd/lpar2rrd/load_xenserver.sh > /home/lpar2rrd/lpar2rrd/load_xenserver.out 2>&1
-
Initial start from cmd line:
$ cd /home/lpar2rrd/lpar2rrd
$ ./load.sh
- Go to the web UI: http://<your web server>/lpar2rrd/
Use Ctrl-F5 to refresh the web browser cache.
Troubleshooting
-
If you have any problems with the UI then check:
(note that the path to Apache logs might be different, search apache logs in /var)tail /var/log/httpd/error_log # Apache error log tail /var/log/httpd/access_log # Apache access log tail /var/tmp/lpar2rrd-realt-error.log # STOR2RRD CGI-BIN log tail /var/tmp/systemd-private*/tmp/lpar2rrd-realt-error.log # STOR2RRD CGI-BIN log when Linux has enabled private temp
- Test of CGI-BIN setup
umask 022
cd /home/lpar2rrd/lpar2rrd/
cp bin/test-healthcheck-cgi.sh lpar2rrd-cgi/
go to the web browser: http://<your web server>/lpar2rrd/test.html
You should see your Apache, LPAR2RRD, and Operating System variables, if not, then check Apache logs for connected errors