IBM Power Systems Monitoring
Skip Prerequisites, Web and LPAR2RRD tabs in case of configuring Virtual Appliance, Docker or a Container
Follow installation procedure for your operating system platform
HW sizing
Consider usage of our brand new full-stack infrastructure monitoring tool XorMon Next Generation as LPAR2RRD replacement.
It brings a new level of infrastructure monitoring by relying on a modern technology stack.
In particular, reporting, exporting, alerting and presentation capabilities are unique on the market.
You have 2 options how to connect the HMC.
create a HMC account with role hmcviewer on the HMC server
Paste the pub key created above to mkauthkeys command on the HMC
(as hscroot, all in one line, without carriage returns):
Note a problem on HMC V8.8.6+ where user hscroot is not able to set user's SSH keys with no printing any error message.
As a workaround log as lpar2rrd and run mkauthkeys:
create lpar2rrd user under sysadmin account with role SMMonitor:
- HMC REST API: it brings you physical adapter stats, enhanced configuration in compare to CLI access,
it uses read-only user on the HMC with a password authentification - HMC CLI: it uses ssh-key based authorisation on HMC, read-only account
HMC CLI
-
Allow access from the LPAR2RRD host to all HMCs on port 22 TCP
You might either verify it manually from command line or run "test" in the UI after HMC addition.$ perl /home/lpar2rrd/lpar2rrd/bin/conntest.pl 192.168.1.1 22 Connection to "192.168.1.1" on port "22" is ok
-
Assure you can connect to the HMC via ssh. If not then either follow IBM docu or below points:
- Enable remote cmd execution:
HMC UI (classic) ➡ HMC management ➡ Remote Command Execution ➡ Enable - Assure that HMC firewall allows incoming ssh conections :
HMC UI (classic) ➡ HMC management ➡ Change net settings ➡ LAN adapters ➡ Select open interface ➡ Firewall ➡ Select SSH ➡ Allow incoming ➡ OK ➡ OK
- Enable remote cmd execution:
Allow data collection on the HMC
-
Allow utilization data collection (either via the HMC UI or globally via following cmd as hscroot)
$ ssh hmc1 -l hscroot
hscroot@hmc1:~> chlparutil -r config -s 60
hscroot@hmc1:~> lslparutil -r config  -F name,sample_rate
PWR6A-9117-MMA-SN103AXXX,60
PWR6B-9117-MMA-SN103BXXX,60
Allow password less access to the HMC
-
Create ssh keys (type enter when you are prompted for passphrase) under lpar2rrd user on LPAR2RRD server
$ who am I
  lpar2rrd    pts/0       Jan 10 10:13     (192.168.1.240)
$ ssh-keygen -t rsa  -N ""
  Generating public/private rsa key pair.
  Enter file in which to save the key (/home/lpar2rrd/.ssh/id_rsa):
$ cat /home/lpar2rrd/.ssh/id_rsa.pub
'ssh-rsa AAAAB3NzaC1kc3MAAACBALvbupPLnqy6UfJjgMG5SRnnFDfD013OtBxFv8P7qoHfGKCG0Vu2
IhNCYttpYMmsMR+BWADo4c9oT7r92raLfVDjNW8uO5C5fatK305+sNqazbT91HDDNDKQnbpoKUqybVRC2
BQbPR8ESh+ws3uHdxXSQKwOSyrHO6Nwkkx8/h4TAAAAFQDZgT9MxrEUQg4uOwxhciwwdoOO8QAAAIAH37
x06Ia4FiCdlk3U9vuOI0QEvCKMXL+ZPFNoRcgiqiCnR2WeiaG5qM+odYWk/F/owV0Y/DmkmrrjPrgDADj
S1uKoSy+NMg803+4cS1B06EMtia+RmMbWkr+kQZ90WvB8C5cxofzcllnQjztQxVrZnZPmMI73/SQdS7QB
U9a9WwAAAIA3VAdMvP+ZO3zs57FaznMySoszxgNWxuINlcP61TQuyuCp5Bq3mFXwxFwJWPpqpbW5yHj9N
1+3pscSsFxEQb9YVvb1oL9c5QdPDnmXZK8BHHmNZMn+ftuzJKHgR2lynaxQ4hxTnz+xT0ywGwokeuuCnr
4G3Bftc70Yn9vCNjuzGQ== lpar2rrd@p550-2'
$ ssh-keygen -t ecdsa -b 521 -N ""
HMC
create a HMC account with role hmcviewer on the HMC server
$ ssh -l hscroot hmc1
hscroot@hmc1:~> mkhmcusr -u lpar2rrd -a hmcviewer --passwd abc1234
(as hscroot, all in one line, without carriage returns):
hscroot@hmc1:~> mkauthkeys -u lpar2rrd -a 'ssh-rsa AAAAB3NzaC1kc3MAAACBALvbupPL
nqy6UfJjgMG5SRnnFDfD013OtBxFv8P7qoHfGKCG0Vu2IhNCYttpYMmsMR+BWADo4c9oT7r92raLfVDjNW
8uO5C5fatK305+sNqazbT91HDDNDKQnbpoKUqybVRC2BQbPR8ESh+ws3uHdxXSQKwOSyrHO6Nwkkx8/h4T
AAAAFQDZgT9MxrEUQg4uOwxhciwwdoOO8QAAAIAH37x06Ia4FiCdlk3U9vuOI0QEvCKMXL+ZPFNoRcgiqi
CnR2WeiaG5qM+odYWk/F/owV0Y/DmkmrrjPrgDADjS1uKoSy+NMg803+4cS1B06EMtia+RmMbWkr+kQZ90
WvB8C5cxofzcllnQjztQxVrZnZPmMI73/SQdS7QBU9a9WwAAAIA3VAdMvP+ZO3zs57FaznMySoszxgNWxu
INlcP61TQuyuCp5Bq3mFXwxFwJWPpqpbW5yHj9N1+3pscSsFxEQb9YVvb1oL9c5QdPDnmXZK8BHHmNZ{{M
n+ftuzJKHgR2lynaxQ4hxTnz+xT0ywGwokeuuCnr4G3Bftc70Yn9vCNjuzGQ== lpar2rrd@p550-2'
$ ssh -l lpar2rrd hmc1
  password:

lpar2rrd@hmc1:~> ls -l .ssh/authorized_keys2
  ls: cannot access .ssh/authorized_keys2: No such file or directory

lpar2rrd@hmc1:~> mkauthkeys -a 'ssh-rsa AAAAB3NzaC1kc3MAAACBALvbupPL
nqy6UfJjgMG5SRnnFDfD013OtBxFv8P7qoHfGKCG0Vu2IhNCYttpYMmsMR+BWADo4c9oT7r92raLfVDjNW
8uO5C5fatK305+sNqazbT91HDDNDKQnbpoKUqybVRC2BQbPR8ESh+ws3uHdxXSQKwOSyrHO6Nwkkx8/h4T
AAAAFQDZgT9MxrEUQg4uOwxhciwwdoOO8QAAAIAH37x06Ia4FiCdlk3U9vuOI0QEvCKMXL+ZPFNoRcgiqi
CnR2WeiaG5qM+odYWk/F/owV0Y/DmkmrrjPrgDADjS1uKoSy+NMg803+4cS1B06EMtia+RmMbWkr+kQZ90
WvB8C5cxofzcllnQjztQxVrZnZPmMI73/SQdS7QBU9a9WwAAAIA3VAdMvP+ZO3zs57FaznMySoszxgNWxu
INlcP61TQuyuCp5Bq3mFXwxFwJWPpqpbW5yHj9N1+3pscSsFxEQb9YVvb1oL9c5QdPDnmXZK8BHHmNZ{{M
n+ftuzJKHgR2lynaxQ4hxTnz+xT0ywGwokeuuCnr4G3Bftc70Yn9vCNjuzGQ== lpar2rrd@p550-2'
SDMC/FLEX
create lpar2rrd user under sysadmin account with role SMMonitor:
$ ssh -l sysadmin smdc1
sysadmin@sdmc:~> smcli mkuser -u lpar2rrd -g smmon -p abc1234
sysadmin@sdmc:~> smcli chuser -u lpar2rrd -e expire 9999 # do not let it expire
sysadmin@sdmc:~> mkauthkeys -u lpar2rrd -a 'ssh-rsa AAAAB3NzaC1kc3MAAACBALvbupPL
nqy6UfJjgMG5SRnnFDfD013OtBxFv8P7qoHfGKCG0Vu2IhNCYttpYMmsMR+BWADo4c9oT7r92raLfVDjNW
8uO5C5fatK305+sNqazbT91HDDNDKQnbpoKUqybVRC2BQbPR8ESh+ws3uHdxXSQKwOSyrHO6Nwkkx8/h4T
AAAAFQDZgT9MxrEUQg4uOwxhciwwdoOO8QAAAIAH37x06Ia4FiCdlk3U9vuOI0QEvCKMXL+ZPFNoRcgiqi
CnR2WeiaG5qM+odYWk/F/owV0Y/DmkmrrjPrgDADjS1uKoSy+NMg803+4cS1B06EMtia+RmMbWkr+kQZ90
WvB8C5cxofzcllnQjztQxVrZnZPmMI73/SQdS7QBU9a9WwAAAIA3VAdMvP+ZO3zs57FaznMySoszxgNWxu
INlcP61TQuyuCp5Bq3mFXwxFwJWPpqpbW5yHj9N1+3pscSsFxEQb9YVvb1oL9c5QdPDnmXZK8BHHmNZ{{M
n+ftuzJKHgR2lynaxQ4hxTnz+xT0ywGwokeuuCnr4G3Bftc70Yn9vCNjuzGQ== lpar2rrd@p550-2'
Connectivity test
- test the connection between the LPAR2RRD hosted server and HMC
(should not request password any more) as lpar2rrd user:$ ssh -l lpar2rrd hmc1 The authenticity of host 'hmc1 (9.138.236.97)' can′t be established. RSA key fingerprint is 97:e1:a5:c2:58:3c:c6:0c:d1:6f:4d:6e:62:9c:68:4b. Are you sure you want to continue connecting (yes/no)? yes lpar2rrd@hmc1:~>
- if you use a commercial SSH distribution (like F-Secure ssh) which supports only SSH2 format (above example was for OpenSSH format), then you need to convert public keys onto OpenSSH format before uploading the keys into HMC. Convert SSH2 to OpenSSH format and after that use it in mkauthkeys:
$ ssh-keygen -i -f your-ssh2.pub > your-openssh.pub
- Configure HMC from LPAR2RRD UI (v6.00+)
- Allow "real-time" refresh on demand, WEB user (apache, nobody) needs to have access to SSH keys
- find out WEB user
$ ps -ef|egrep "apache|httpd"|grep -v grep|awk '{print $1}'|grep -v "root"|head -1 nobody - under root user copy SSH keys and change ownership to the WEB user
# cp /home/lpar2rrd/.ssh/id_rsa /home/lpar2rrd/.ssh/realt_rsa
# chown nobody /home/lpar2rrd/.ssh/realt_rsa
# chmod 600 /home/lpar2rrd/.ssh/realt_rsa
- find out WEB user
-
Assure you have enough of disk space on the fs where is LPAR2RRD installed
Roughly you might count 5MB/lpar (10MB/lpar in dual HMC setup) == 1GB/100lpars (without the OS agent)$ df -g /home # AIX $ df -h /home # linux
- Schedule alerting
$ crontab -e

0,10,20,30,40,50 * * * * /home/lpar2rrd/lpar2rrd/load_alert.sh > /home/lpar2rrd/lpar2rrd/load_alert.out 2>&1
-
Schedule job for getting network IVE (HEA) statistics if you use it in your IBM Power servers
$ crontab -e

0,5,10,15,20,25,30,35,40,45,50,55 * * * * /home/lpar2rrd/lpar2rrd/load_hea.sh > /home/lpar2rrd/lpar2rrd/load_hea.out 2>&1
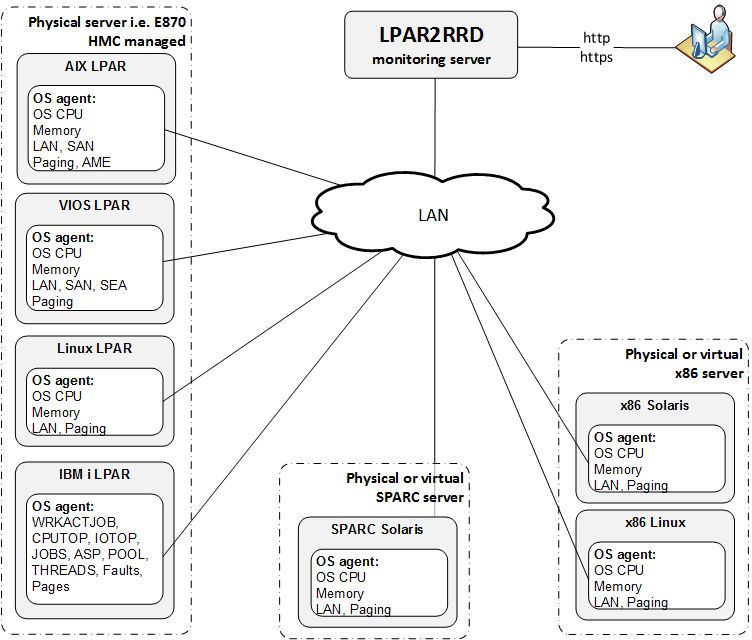
Follow installation procedure for your operating system platform
OS agent is add-on feature for monitoring from operating system level.
It is monitoring CPU, memory utilization, paging, LAN and SAN traffic on all adapters.
It requires the OS agent deployment to every monitored LPAR.
The agent is written in Perl and calls basic OS commands to obtain required statistics like vmstat, lparstat and svmon.
 |
Additional information about the OS agent:
- OS agent description
- OS agent release notes and download
- Features supported by the OS agent.
HMC monitoring via the OS agent
IBM i (AS/400) OS agent
Prerequisites
- Perl on each LPAR (each OS already contains it, no special modules necessary)
- Opened TCP communication between each LPAR and LPAR2RRD server on port 8162.
Connections are initiated from LPARs. - Additional disk space on LPAR2RRD server (about 40MB per each monitored LPAR)
-
Create preferable dedicated user lpar2rrd on each host with minimum rights
# useradd -s /usr/bin/ksh -c "LPAR2RRD agent user" -m lpar2rrd
-
In case of VIO server do not use padmin account and mkuser cmd, that would not work!
Create the account under root in the same way as on usual AIX (like above useradd).
OS agent installation (client)
-
Get the latest OS agent from download page
- AIX & Linux installation under root
# rpm -Uvh lpar2rrd-agent-6.00-0.ppc.rpm
# rpm -qa|grep lpar2rrd-agent
  lpar2rrd-agent-6.00-0
AIX 7.1+ note: you might need to specify option "--ignoreos" if you get an error:
"package lpar2rrd-agent-5.00-0 is for a different operating system"# rpm -Uvh --ignoreos lpar2rrd-agent-6.00-0.ppc.rpm
- Linux Debian
# apt-get install lpar2rrd-agent_6.00-0_all.deb
  lpar2rrd-agent-6.00-0
- Oracle Solaris installation under root:
# gunzip lpar2rrd-agent-5.00-0.solaris-i86pc.tar.gz
# tar xf lpar2rrd-agent-5.00-0.solaris-i86pc.tar
# pkgadd -d .
  The following packages are available:
  1  lpar2rrd-agent     LPAR2RRD OS agent 5.00
                        (i86pc) 5.00
 ...
Oracle Solaris upgrade under root:# pkgrm lpar2rrd-agent # pkgadd -d .
- Schedule its run every minute from the crontab on every LPAR.
This line must be placed into lpar2rrd crontab:# su - lpar2rrd $ crontab -e * * * * * /usr/bin/perl /opt/lpar2rrd-agent/lpar2rrd-agent.pl <LPAR2RRD-SERVER.your-domain.com> > /var/tmp/lpar2rrd-agent.out 2>&1
Replace <LPAR2RRD-SERVER> by hostname of your LPAR2RRD server.
Use preferably FDQN in LPAR2RRD hostname, hostname only might have a problem with resolving.
- You might need to add lpar2rrd user into /etc/cron.allow (Linux) or /var/adm/cron/cron.allow (AIX) if 'crontab -e' command fails
Allow it for lpar2rrd user as root user.# echo "lpar2rrd" >> /etc/cron.allow
LPAR2RRD server (daemon)
-
Edit etc/lpar2rrd.cfg and set following (if it is not already set):
$ vi /home/lpar2rrd/lpar2rrd/etc/lpar2rrd.cfg

LPAR2RRD_AGENT_DAEMON=1
-
The daemon is started when load.sh starts
$ ./load.sh
  Starting LPAR2RRD daemon on port:8162
  ...
- Assure it is running and listening on port 8162:
$ ps -ef|grep lpar2rrd-daemon
  lpar2rrd 10617010 1 0 Mar 16 - 0:00 /usr/bin/perl -w /home/lpar2rrd/lpar2rrd/bin/lpar2rrd-daemon.pl
$ netstat -an| grep 8162
  tcp4  0  0  *.8162   *.*   LISTEN
- OS agent data graphs will appear in the UI, use Ctrl-F5 to refresh your web browser
Troubleshooting
-
Client (agent) side:
-
Test if communication through the LAN is allowed.
$ telnet  <LPAR2RRD-SERVER> 8162
  Connected to 192.168.1.1   .
  Escape character is '^]'.
This is ok, exit either Ctrl-C or ^].
-
Check following agent files:
data store: /var/tmp/lpar2rrd-agent-*.txt
error log: /var/tmp/lpar2rrd-agent-*.err
output log: /var/tmp/lpar2rrd-agent.out
-
run the agent from cmd line:
$ /usr/bin/perl /opt/lpar2rrd-agent/lpar2rrd-agent.pl -d <LPAR2RRD-SERVER>
  ...
  Agent send     : yes : forced by -d
  Agent send slp: sending wait: 4
  OS/HMC agent working for server: <LPAR2RRD-SERVER>
  store file for sending is /var/tmp/lpar2rrd-agent-<LPAR2RRD-SERVER>-lpar2rrd.txt
It means that data has been sent to the server, all is fine
Here is example when the agent is not able to sent data :$ /usr/bin/perl /opt/lpar2rrd-agent/lpar2rrd-agent.pl -d <LPAR2RRD-SERVER> ... Agent send : yes : forced by -d Agent send slp: sending wait: 1 OS/HMC agent working for server: <LPAR2RRD-SERVER> store file for sending is /var/tmp/lpar2rrd-agent-<LPAR2RRD-SERVER>-lpar2rrd.txt Agent timed out after : 50 seconds /opt/lpar2rrd-agent/lpar2rrd-agent.pl:265
It means that the agent could not contact the server.
Check communication, port, above telnet example, DNS resolution of the server etc.
-
Test if communication through the LAN is allowed.
-
Server side:
- test if the daemon on LPAR2RRD server is running, and checking the logs
$ ps -ef|grep lpar2rrd-daemon
  lpar2rrd 10617010 1 0 Mar 16 - 0:00 /usr/bin/perl -w /home/lpar2rrd/lpar2rrd/bin/lpar2rrd-daemon.pl
$ cd /home/lpar2rrd/lpar2rrd
$ tail logs/error.log-daemon
$ tail logs/daemon.out
  new server has been found and registered: Linux (lpar=linuxhost01)
  mkdir : /lpar2rrd/data/Linux/no_hmc/linuxhost01/
It means that new OS agent has been registered from linuxhost01 (Linux stand-alone example)
-
Test if OS agent data is being stored on the LPAR2RRD server and have actual timestamp:
$ cd /home/lpar2rrd/lpar2rrd
$ ls -l data/<server name>/*/<lpar name>/*mmm
  -rw-r--r-- 2 lpar2rrd staff  7193736 Mar 17 16:16 data/<server name>/<hmc name>/<lpar name>/cpu.mmm
  -rw-r--r-- 2 lpar2rrd staff  7193736 Mar 17 16:16 data/<server name>/<hmc name>/<lpar name>/lan-en1.mmm
  -rw-r--r-- 2 lpar2rrd staff 10790264 Mar 17 16:16 data/<server name>/<hmc name>/<lpar name>/mem.mmm
  -rw-r--r-- 2 lpar2rrd staff  7193736 Mar 17 16:16 data/<server name>/<hmc name>/<lpar name>/pgs.mmm
  -rw-r--r-- 2 lpar2rrd staff  7193736 Mar 17 16:16 data/<server name>/<hmc name>/<lpar name>/san-vscsi0.mmm
  -rw-r--r-- 2 lpar2rrd staff  3597208 Mar 17 16:16 data/<server name>/<hmc name>/<lpar name>/san_resp-vscsi0.mmm
$ find data -name mem.mmm -exec ls -l {} \;
  ...
- test if the daemon on LPAR2RRD server is running, and checking the logs
-
In case of a problem check our forum or contact us via support@lpar2rrd.com.
We would need this data for start of troubleshooting.
Notes
-
You will not need to upgrade LPAR2RRD agents regularly with each LPAR2RRD upgrade.
Read release notes if that is necessary.
Check OS agent upgrade steps.
Further docu
Installation
-
Download the latest OS agent for IBM i (R6.1.0+).
After unzipping you get LPAR2RRD.savf in save file format.
- Open TCP communication on your network between each IBM i LPAR with the OS agent installed and LPAR2RRD server on port 8162. Connections are initiated from the agent side (IBM i).
-
Create User Profile LPAR2RRD
This user profile will be owner of all restored objects in library LPAR2RRD and this user profile is the name of the user profile for the agent being submitted.
Parameters of CRTUSRPRF command depend on AS400 security policy you have in place.
-
Create save file destination:
CRTSAVF FILE(QGPL/LPAR2RRD)
-
Execute that only if you installing Enterprise Edition of LPAR2RRD IBM i OS agent.
It contains ASP latency monitoring.
Use Grant Object Authority (GRTOBJAUT) command to grant *USE authority for APIs QPMWKCOL and QPMLPFRD:GRTOBJAUT OBJ(QSYS/QPMLPFRD) OBJTYPE(*PGM) USER(LPAR2RRD) AUT(*use) GRTOBJAUT OBJ(QSYS/QPMWKCOL) OBJTYPE(*PGM) USER(LPAR2RRD) AUT(*use)
-
Transfer LPAR2RRD.savf to IBM i system from your PC via ftp.
All below under LPAR2RRD user account.Do not forget to logoff from ftp session to do not lock it out.ftp <ph.server.com> Connected to as400. 220-QTCP at 192.168.177.50. 220 Connection will close if idle more than 5 minutes. Name (as400.server.com:lpar2rrd): lpar2rrd 431 Requested security mechanism not available at this time. 331 Enter password. Password: 230 LPAR2RRD logged on. Remote system type is . ftp> bin ftp> cd qgpl ftp> put LPAR2RRD.savf LPAR2RRD local: LPAR2RRD.savf remote: LPAR2RRD 200 PORT subcommand request successful. 150 Sending file to member LPAR2RRD in file LPAR2RRD in library QGPL. 226 File transfer completed successfully. 3590400 bytes sent in 0.41 secs (9007.2 kB/s) ftp> by
-
Display library
DSPSAVF FILE(QGPL/LPAR2RRD) OUTPUT(*) LPAR2RRD *LIB PROD LPAR2RRD 152 YES ACCEPTFREE *PGM CLE LPAR2RRD 176 YES ... -
Restore Library
RSTLIB SAVLIB(LPAR2RRD) DEV(*SAVF) SAVF(QGPL/LPAR2RRD)
     MBROPT(*ALL) ALWOBJDIF(*ALL)
  35 object restored from LPAR2RRD to LPAR2RRD.
CHGJOBD JOBD(LPAR2RRD/LPAR2RRD) JOBQ(LPAR2RRD/LPAR2RRD) TEXT('RTV_SYSSTS') USER(LPAR2RRD) RQSDTA(*NONE) INLLIBL(LPAR2RRD QGPL QTEMP)After this command see LPAR2RRD *JOBD object in restored LPAR2RRD library.
-
In the "initial user part of the library list" specify LPAR2RRD library. Parameter INLLIBL in *JOBD object.
See LPAR2RRD *JOBD object into restored LPAR2RRD library.CHGUSRPRF USRPRF(LPAR2RRD) JOBD(LPAR2RRD/LPAR2RRD)
-
Create directory* /home/LPAR2RRD.
MKDIR DIR('/home/LPAR2RRD') -
Grant rights LPAR2RRD user for *SRVPGM QSYS/QPMLPMGT
GRTOBJAUT OBJ(QSYS/QPMLPMGT) OBJTYPE(*SRVPGM) USER(LPAR2RRD) AUT(*use)
-
Test network connectivity
For example if hostname of LPAR2RRD server is LPAR2RRD-SERVER.SERVER.COM.- ping:
PING RMTSYS('LPAR2RRD-SERVER.SERVER.COM') Verifying connection to host system LPAR2RRD-SERVER.SERVER.COM at address 192.168.1.2. Connection verification statistics: 5 of 5 successful (100 %). -
telnet:
If you get after 15 seconds "No response from remote host system within open time-out." then it is wrong!.
TELNET RMTSYS('LPAR2RRD-SERVER.SERVER.COM') PORT(8162) RMTUSER(TESTSTRING) INZWAIT(15)
  Connecting to remote host 192.168.1.2 using port 8162
Either LPAR2RRD server daemon is not running or TCP connection is filtered on the network by a firewall.
If connection hanging (it times out in 10 mins) then it is ok, you can interrupt it by:
SysRq ➡ Enter ➡ 2. End previous request
- ping:
-
Configure LPAR2RRD server host
Change Monitor Server Name or IP addr (IPADR) to your running LPAR2RRD server
This step must be done, because default server IP address for sending data is LOOPBACK.
- Using hostname:
CHGCMDDFT CMD(LPAR2RRD/RTV_SYSSTS) NEWDFT('IPADR(LPAR2RRD-SERVER.SERVER.COM)') -
Using IP address:
CHGCMDDFT CMD(LPAR2RRD/RTV_SYSSTS) NEWDFT('IPADR(''192.168.1.2'')')
- Using hostname:
-
Recommendation: Change User profile LPAR2RRD PASSWORD to *NONE to forbid remote LPAR2RRD user access.
CHGUSRPRF USRPRF(LPAR2RRD) PASSWORD(*NONE)
-
Accept license agreement
Only for users using free version without support. Licensing details.
In the case that the start LPAR2RRD agent is executed without acceptance, then an error message appears.ADDLIBLE LPAR2RRD GO MENU Select: 14 Accept Software Licensing Agreement ➞ page down ➞ F14 Accept OK:CL_ACCEPT Expiration date of this client is 2017-06-25
ER: RTV_SYSSTS: frp.HASH512not not correct.
ER: RTV_SYSSTS: Please revalidate i5/OS client from MENU option F14.
ER: RTV_SYSSTS: i5/OS client ended.
Agent is licensed to free use for 1 year. You will have to re-accept license in the same way next year.
You can see expiration dates of all agents in the LPAR2RRD UI ➞ menu ➞ LPAR2RRD ➞ Data check ➞ IBM i
-
Start of the agent
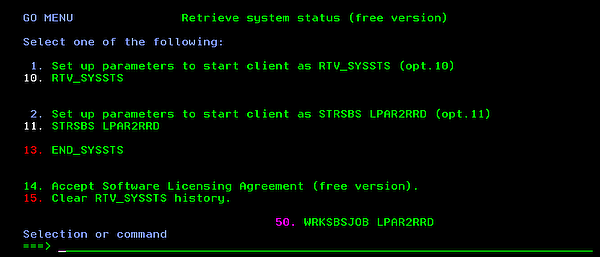
You can start LPAR2RRD agent in two ways.- As a command RTV_SYSSTS.
CHGJOBD JOBD(LPAR2RRD/LPAR2RRD) TEXT('RTV_SYSSTS') RQSDTA(*NONE) RMVAJE SBSD(LPAT2RRD/LPAR2RRD) JOB(LPAR2RRD) ADDLIBLE LPAR2RRD GO MENU Option 1. Set up parameters to start client as RTV_SYSSTS (opt.10) Accept all default parameters for command CHGJOBD and RMVAJE. Option 10. RTV_SYSSTS - As an autostart job entry in LPAR2RRD subsystem.
CHGJOBD JOBD(LPAR2RRD) TEXT('STRSBS SBSD(LPAR2RRD/LPAR2RRD)') RQSDTA('RTV_SYSSTS')
ADDAJE  SBSD(LPAR2RRD/LPAR2RRD) JOB(LPAR2RRD) JOBD(LPAR2RRD/LPAR2RRD)
ADDLIBLE LPAR2RRD
GO MENU
  Option 2. Set up parameters to start client as STRSBS LPAR2RRD (option 11)
    Accept all default parameters for command CHGJOBD and ADDAJE.
  Option 11. STRSBS LPAR2RRD
Option 1 and Option 2 is used only once or when you decide to change the way the program starts.
Use F1 as a help for RTV_SYSSTS command.
- As a command RTV_SYSSTS.
-
Status of the agent.
GO MENU
  Select: Option 50
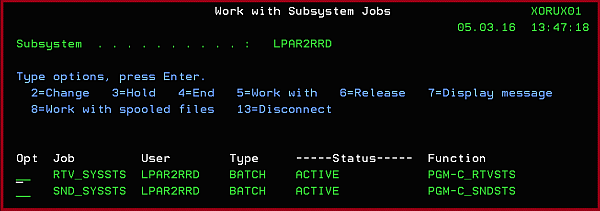
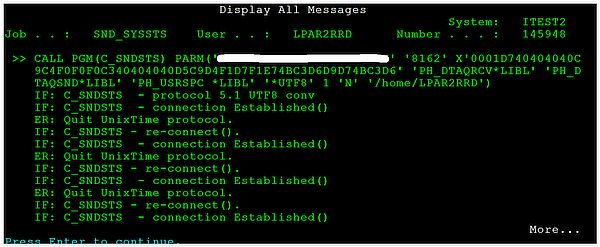
On the SND_SYSSTS line ➞ type 5 ➞ type 10 ➞ F10 and you have to see:

You have to see this message after 10 - 20 minutes from the agent start:
It says that connection to LPAR2RRD server has been established and some data has been already sent out.
IF: C_SNDSTS - connection Established()
-
LPAR2RRD UI
You will see IBM i data in the UI after first load.sh run on the server (it usually runs once an hour).
Go to the UI, follow the server and lpar. (Ctrl-F5 is necessary to refresh the UI)
-
Stop of the agent
On the job log you will see:
ADDLIBLE LPAR2RRD
GO MENU
 Select: 13. END_SYSSTS ➞  Enter ➞ Enter
WRKJOB
 ➞ option 10 ➞ Display job log, if active, on job queue, or pending
  F10, F18 ...

  IN: END_SYSSTS No active jobs in subsystem LPAR2RRD
  Ending of subsystem LPAR2RRD in progress.
  IN: END_SYSSTS EndSbs LPAR2RRD   *Immed
  EN: END_SYSSTS - *ALL.

GO MENU
 Select: option 50 ➞  WRKSBSJOB LPAR2RRD
See above that subsystem LPAR2RRD is not active.
-
if you create your user profile LPAR2RRD set JOBD parameter as a Job description which includes in INLLIBL LPAR2RRD library too (QTEMP,LPAR2RRD).
CRTUSRPRF USRPRF(LPAR2RRD)  ..... JOBD(LPAR2RRD/LPAR2RRD) ......
CHGJOBD JOBD(LPAR2RRD/LPAR2RRD) ....  INLLIBL(LPAR2RRD QTEMP)     ....
Notes
-
LPAR2RRD agent uses dlpar_get_info API - service program QPMLPMGT in QSYS.
When user profile LPAR2RRD under which LPAR2RRD agent being submitted is not authorized to this service program, obtain authority to this service program e.g. by command:GRTOBJAUT OBJ(QSYS/QPMLPMGT) OBJTYPE(*SRVPGM) USER(LPAR2RRD) AUT(*USE)
Be careful if you upgrade your i5/OS. Service program QPMLPMGT is into QSYS library.
Troubleshooting
- Communication problem: repeated connections with failures.
This is a bug in v1.1.0 agent version which might very rare occure, upgrade to v1.1.1+.
- Communication problem: errors when the agent connecting the server
If you see into SND_SYSSTS eny errno > 0 message:
There is a communication error.
It might have 2 reasons:- IP address or port is wrong. (check above how to change it)
- IP connection between LPAR2RRD server and IBM i is not allowed on port 8162.
Stop the agent and correct IP address/port or firewall setup. Start it up as soon as it is fixed.ADDLIBLE LPAR2RRD LPAR2RRD/END_SYSSTS
-
Error during FTP:
Change User profile JOBD job description via QSECOFR account:
530 Not able to set ASP group for user LPAR2RRD; logon rejected.
CHGUSRPRF USRPRF(LPAR2RRD) JOBD(QGPL/QDFTJOBD)
-
Error during RSTLIB:
LPAR2RRD library is being used by someone else, release it (open ftp session etc) and try it again:
Cannot use lib LPAR2RRD in library QSYS
- In case of a problem check our forum or contact us via support@lpar2rrd.com
You have 2 options how to connect the HMC.
You can use HMC CLI on older HMCs and HMC REST API on newer HMCs in single LPAR2RRD instance
Just follow same steps as above.
Original HMC CLI will be disabled, data will continue via REST API, no data lose
- HMC REST API: it brings you physical adapter stats, enhanced configuration in compare to CLI access,
it uses read-only user on the HMC with a password authentification - HMC CLI: it uses ssh-key based authorisation on HMC, read-only account
HMC REST API
It supports HMC v8+, use HMC CLI (ssh) in case of older HMCsYou can use HMC CLI on older HMCs and HMC REST API on newer HMCs in single LPAR2RRD instance
HMC Configuration
-
Allow access from the LPAR2RRD host to all HMCs on port 12443 TCP
You might either verify it manually from command line or run "test" in the UI after HMC addition.$ perl /home/lpar2rrd/lpar2rrd/bin/conntest.pl 192.168.1.1 12443 Connection to "192.168.1.1" on port "12443" is ok
-
Create lpar2rrd user on each HM, read-only role, with password.
Use HMC local user account, not the domain one.
- Allow remote access via the web:
HMC v10: Menu ➡ User management ➡ User profiles ➡ lpar2rrd ➡ modify ➡ Properties ➡ Allow remote access via the web
HMC older:Menu ➡ Manage User Profiles and Access ➡ select lpar2rrd ➡ modify ➡ User properties ➡ Allow remote access via the web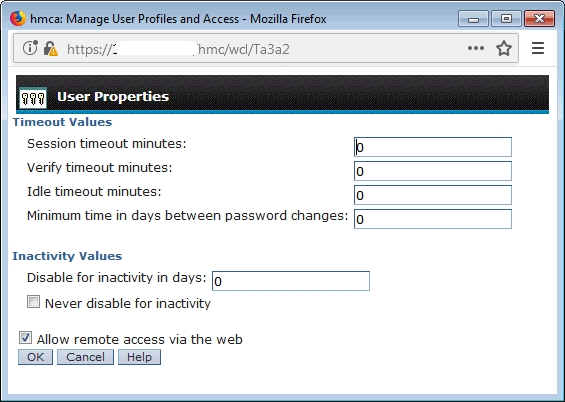
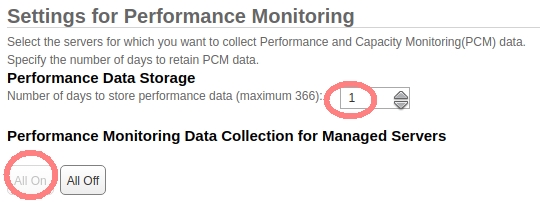
- LPAR2RRD requires HMC LongTermMonitor enabled. It is part of Performance Monitoring in HMC Workplace.
This performance monitoring can store up to 366 days of data. LPAR2RRD uses performance data only 30 minutes old so you can set the minimum number of days to store performance data (1 day).- HMC v10: Menu ➡ Performance dashboard ➡ System dashboard ➡ Turn data collection on
-
HMC v9:
HMC Management ➡ Console Settings ➡ Change Performance Monitoring Settings ➡ All on
Note: in case of HMC v10 you need to go into the "user settings", and switch to the old UI: Switch to old dashboard. After switching to the old UI, you’re able to navigate to the corresponding settings.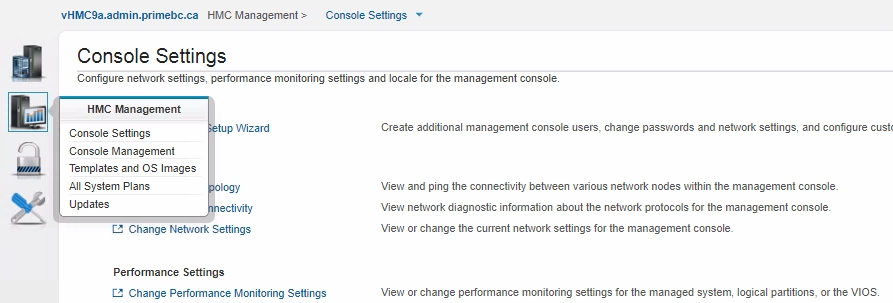
-
Setup on older HMC:
HMC Management ➡ Operations ➡ Change Performance Monitoring Settings ➡ All On
- HMC v10: Menu ➡ Performance dashboard ➡ System dashboard ➡ Turn data collection on
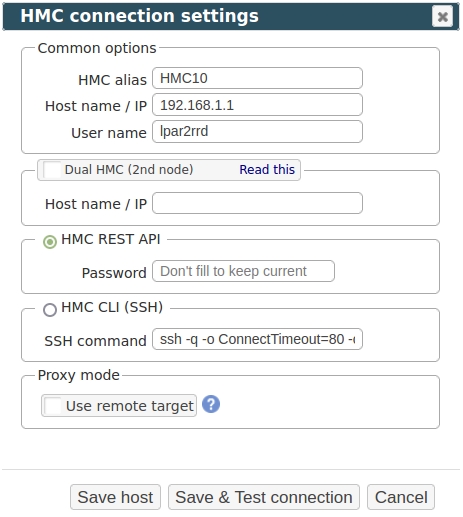
LPAR2RRD Configuration
- Configure HMC access in the LPAR2RRD UI, start at the settings button on the top right ➡ IBM Power Systems ➡ select HMC ➡
- Assure you have a cron job for HMC REST API in place (upgrade script might do it automatically)
Skip it on the Virtual Appliance, it is already there.Add if they do not exist like above# su - lpar2rrd $ crontab -l | egrep "load_hmc_rest_api.sh" $
$ crontab -e

# IBM Power Systems - REST API
0,20,40 * * * * /home/lpar2rrd/lpar2rrd/load_hmc_rest_api.sh > /home/lpar2rrd/lpar2rrd/load_hmc_rest_api.out 2>&1
-
Wait about 30 minutes, then refresh the web browser cache by Ctrl-F5
http://<your web server>/lpar2rrd/
Migration from older HMC CLI
If you already use LPAR2RRD with usage HMC CLI (via SSH) then you can simply migrate to REST API access.Just follow same steps as above.
Original HMC CLI will be disabled, data will continue via REST API, no data lose
Examples
Check our live demo site where all IBM Power servers data came through REST API.Type |
Source |
Sample rate |
Data download |
|---|---|---|---|
| CMC | CMC REST API | 1 minute | 20 mins |
| HMC | |||
| HMC REST API | 1 minute | 20 mins | |
| HMC CLI | 1 hour | ||
| OS agent | |||
| AIX | 1 minute | ~20 mins | |
| VIOS | |||
| Linux on POWER | |||
| Linux x86 | |||
| IBM i (AS/400) | |||
| NMON | |||
| AIX | 1 minute | 10 mins or offline batch | |
| VIOS | |||
| Linux on POWER | |||
| Linux x86 |
Install LPAR2RRD server (all under lpar2rrd user)
-
Download the latest LPAR2RRD server
Upgrade your already running LPAR2RRD instance.
- Install it:
su - lpar2rrd
tar xvf lpar2rrd-7.XX.tar
cd lpar2rrd-7.XX
./install.sh
- Make sure all Perl modules are in place
cd /home/lpar2rrd/lpar2rrd
. etc/lpar2rrd.cfg; $PERL bin/perl_modules_check.pl
If there is missing "LWP::Protocol::https" then check this docu to fix it
- AIX:
-
If any problem in above cmd which prints missing modelues then adjust following variables in /home/lpar2rrd/lpar2rrd/etc/lpar2rrd.cfg
- If it cannot find RRDp.pm then search it and place its path at the end of PERL5LIB
find /opt -name RRDp.pm 2>/dev/null
  /opt/freeware/lib/perl5/5.34/vendor_perl/RRDp.pm
  /opt/freeware/lib64/perl5/5.34/vendor_perl/RRDp.pm
- This is how should look like some parameters in etc/lpar2rrd.cfg, adjust PERL5LIB if RRDp.pm is in different location
  PERL=/usr/bin/perl
  PERL5LIB=/home/lpar2rrd/lpar2rrd/bin:/home/lpar2rrd/lpar2rrd/vmware-lib:/home/lpar2rrd/lpar2rrd/lib:/opt/freeware/lib64/perl5/5.34/vendor_perl:/opt/freeware/lib/perl5/5.34/vendor_perl
  RRDTOOL=/opt/freeware/bin/rrdtool
Adjust above PERL5LIB path based on which Perl you have in /opt/freeware/bin/perl, above example is for "5.34", you see it in the paths:/opt/freeware/bin/perl -v| head -2 This is perl 5, version 34, subversion 1 (v5.34.1) built for ppc-aix-thread-multi-64all
Especially PERL must be set to /usr/bin/perl
- If it cannot find RRDp.pm then search it and place its path at the end of PERL5LIB
- Enable Apache authorisation
su - lpar2rrd
umask 022
cd /home/lpar2rrd/lpar2rrd
cp html/.htaccess www
cp html/.htaccess lpar2rrd-cgi
- Schedule to run it from lpar2rrd crontab (it might already exist there)
Add if it does not exist as abovecrontab -l | grep load.sh
$ crontab -e

# LPAR2RRD UI
0,30 * * * * /home/lpar2rrd/lpar2rrd/load.sh > /home/lpar2rrd/lpar2rrd/load.out 2>&1
Assure there is just one such entry in crontab.
- You might need to add lpar2rrd user into /etc/cron.allow (Linux) or /var/adm/cron/cron.allow (AIX) if 'crontab -e' command fails
Allow it for lpar2rrd user as root user.# echo "lpar2rrd" >> /etc/cron.allow
- Assure you have a cron job for HMC REST API in place (upgrade script might do it automatically)
Skip it on the Virtual Appliance, it is already there.Add it if it does not exist like abovecrontab -l | grep "load_hmc_rest_api.sh"
crontab -e

# HMC REST API support
0,20,40 * * * *  /home/lpar2rrd/lpar2rrd/load_hmc_rest_api.sh > /home/lpar2rrd/lpar2rrd/load_hmc_rest_api.out 2>&1
-
Initial start from cmd line:
cd /home/lpar2rrd/lpar2rrd
./load.sh
- Go to the web UI: http://<your web server>/lpar2rrd/
Use Ctrl-F5 to refresh the web browser cache.
Troubleshooting
- AIX:
-
In some cases is necessary to set LIBPATH, do not do it unless you see such error during load.sh
Can't load '/usr/opt/perl5/lib/site_perl/5.28.1/aix-thread-multi/auto/XML/Parser/Expat/Expat.so' for module XML::Parser::Expat: Could not load module /usr/opt/perl5/lib/site_perl/5.28.1/aix-thread-multi/auto/XML/Parser/Expat/Expat.so
In this case:cd /home/lpar2rrd/lpar2rrd umask 022 echo "export LIBPATH=/opt/freeware/lib" >> etc/.magic
-
In some cases is necessary to set LIBPATH, do not do it unless you see such error during load.sh
-
If you have any problems with the UI then check:
(note that the path to Apache logs might be different, search apache logs in /var)tail /var/log/httpd/error_log # Apache error log tail /var/log/httpd/access_log # Apache access log tail /var/tmp/lpar2rrd-realt-error.log # STOR2RRD CGI-BIN log tail /var/tmp/systemd-private*/tmp/lpar2rrd-realt-error.log # STOR2RRD CGI-BIN log when Linux has enabled private temp
- Test of CGI-BIN setup
umask 022
cd /home/lpar2rrd/lpar2rrd/
cp bin/test-healthcheck-cgi.sh lpar2rrd-cgi/
go to the web browser: http://<your web server>/lpar2rrd/test.html
You should see your Apache, LPAR2RRD, and Operating System variables, if not, then check Apache logs for connected errors
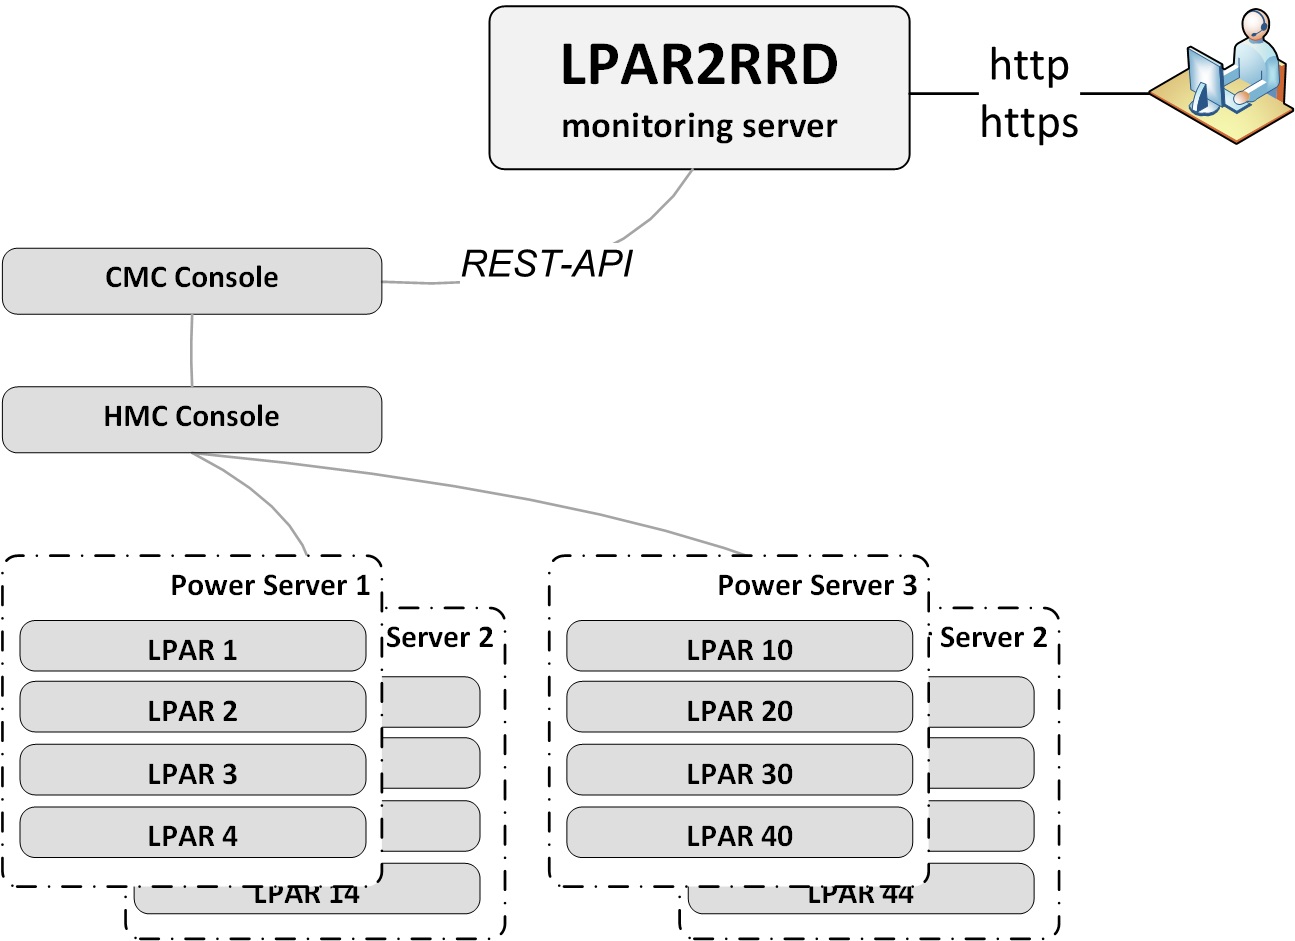
IBM Power Enterprise Pools 2.0
All data is downloaded from the read-only REST API of the CMC console.This does not require HMC data.
 |
Prerequisites
- Open port https (443) from LPAR2RRD server to the CMC console, TCP (or use a proxy)
- CMC Tagging: servers
Tags: all servers in PEP 2.0 must be tagged
Metrics of untagged servers are not approachable.
Connection of untagged server and pool is not approachable by CMC Public API.
Documentation: Manage tags
CMC UI ➡ Inventory
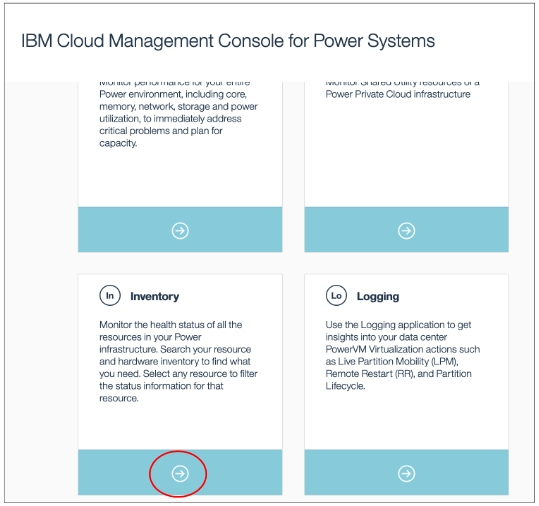
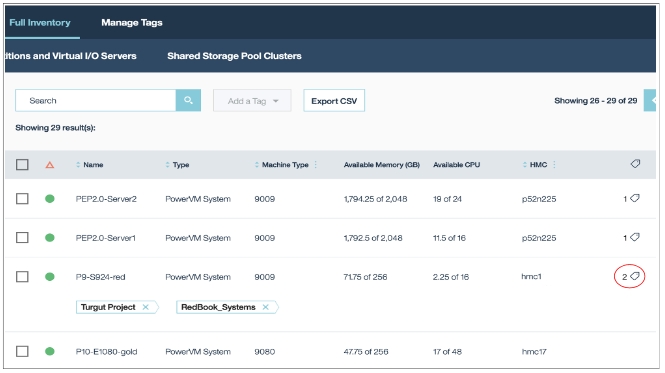
Full Inventory ➡ Managed Systems and HMCs ➡ Select the entries and click "Add a Tag"
To show information about attached tags use the icon on the right:
- Add new CMC into LPAR2RRD:
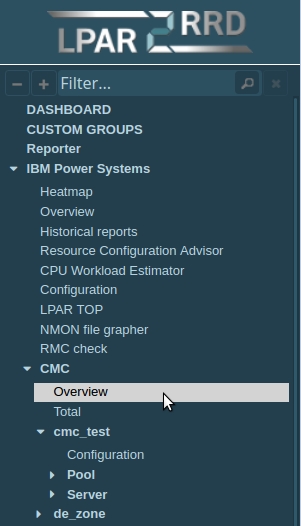
UI ➡ Settings icon ➡ IBM Power System ➡ CMC tab ➡ New
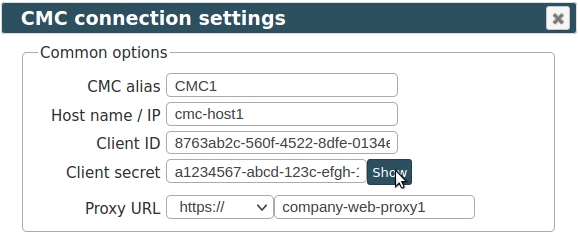
Base URL, Client ID, and Client Secret can be found in the IBM CMC Settings ➡ Public API
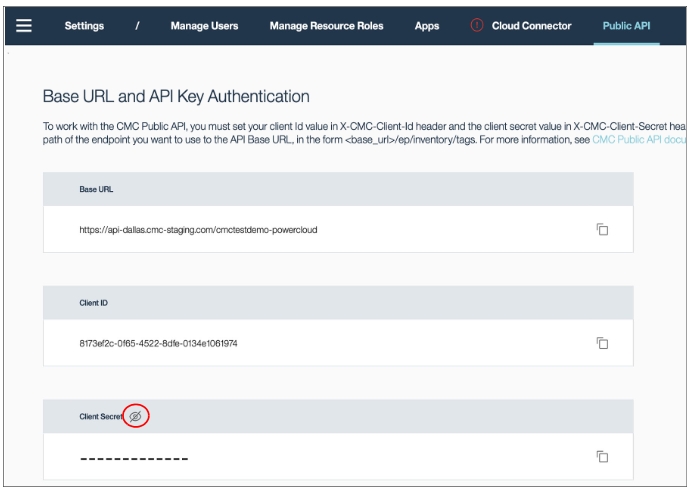
IBM CMC API docu
- Wait an hour after the CMC configuration, then reload the browser, you should see new CMC menu tree: